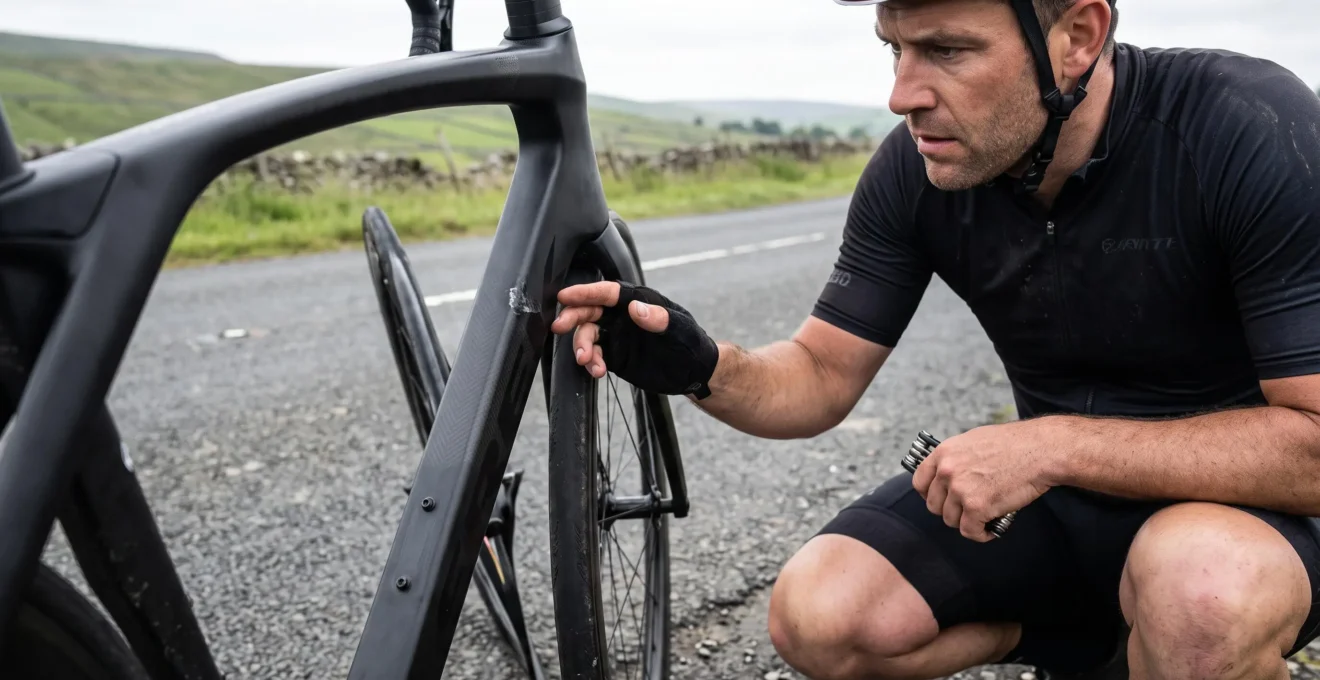
At 95 kg (approximately 209 lb), choosing a carbon road bike for rough roads is less about finding the stiffest or lightest frame and more about matching the entire bicycle to its actual workload. Tyre clearance, wheel construction, total system weight limits, frame condition and component compatibility deserve attention before aerodynamic styling or a few grams of weight savings.
A well-designed carbon frame can handle demanding riding conditions. However, carbon composites respond differently to concentrated impacts and excessive clamping pressure than they do to the distributed loads encountered during normal riding. Damage assessment and correct maintenance therefore matter as much as the material itself.
For a heavier cyclist regularly encountering potholes, chipseal and broken tarmac, the most useful specification is often a combination: adequate tyre volume, compatible rims, suitable load ratings and predictable handling. Understanding how these elements work together also helps distinguish a genuinely durable bicycle from one that simply looks robust.
Carbon road bikes at 95 kg: the essential decisions
- Check total system weight limits: include the bicycle, riding equipment, luggage and rider rather than considering body weight alone.
- Prioritise tyre clearance and wheel suitability: wider compatible tyres, correctly calculated pressure and appropriately rated wheels can improve rough-road control and comfort.
- Manage structural risk: investigate suspected carbon impact damage, follow component-specific torque instructions and treat uncertain used-frame histories cautiously.
- Why Do Carbon Frames Fail After a Minor Tip-Over Instead of Big Crashes?
- How to Check a Used Carbon Bike for Damage Before a 30-Minute Test Ride Ends?
- Which Should You Choose: Carbon or Aluminium if Your Roads Are Full of Potholes?
- The Over-Torque Mistake That Can Crack a Carbon Seatpost in 10 Seconds
- Fix Harsh Road Buzz by Switching Tyre Width and Dropping 10 psi
- Which Should You Choose: 25 mm or 28 mm Tyres if You Ride 70% Chipseal?
- Which Should You Choose: Tubeless or Latex Tubes for Long Weekend Rides?
- How to Gain 1–2 km/h Average Speed With Aerodynamics Without Buying Deep Wheels
Why Do Carbon Frames Fail After a Minor Tip-Over Instead of Big Crashes?
A carbon frame can suffer serious damage from a minor tip-over when the impact concentrates force into a small area. Carbon composites are engineered to withstand specific riding loads, but a sharp contact against an edge can damage internal layers. A larger crash does not necessarily cause less damage; impact location, direction and severity determine the outcome.
Carbon fibre bicycle frames combine reinforcing fibres with a resin matrix. Their strength depends on fibre orientation, laminate construction, tube geometry and the loads anticipated during design. Normal pedalling, braking and road inputs may be distributed through substantial sections of the structure.
A sideways fall against a kerb, however, can concentrate impact energy near a tube wall or joint. The resulting damage may involve fractured fibres, matrix cracking or separation between laminate layers. Some defects are externally obvious; others can remain beneath apparently intact paint.
Visible appearance is not proof of structural integrity. A small paint chip may be superficial, while an unremarkable-looking impact area can conceal damage. Conversely, not every scratch or paint crack means the underlying carbon is compromised.
After a tip-over, a cautious preliminary assessment involves:
- Identifying the exact contact point, including the fork, down tube, chainstays and seatstays.
- Inspecting the surrounding surface under good lighting for cracks, crushed areas, whitening or changes in shape.
- Looking for unexpected wheel or rear-triangle misalignment without assuming that a visual check establishes structural soundness.
- Reporting newly developed creaks or unusual movement to a qualified mechanic rather than deliberately loading the frame to reproduce them.
Some specialists use acoustic tap comparisons as one element of inspection. A change between a crisp and dull sound can motivate further investigation, but wall thickness, construction and frame geometry also affect sound. A home coin-tap test cannot rule out delamination.
The Trek bicycle owner’s manual warns that carbon damage may be invisible and advises stopping and obtaining service when impact damage is suspected. This is a manufacturer-specific instruction, but it illustrates why appearance alone is insufficient.
At 95 kg, rider weight does not automatically make a sound carbon frame unsafe. It does, however, make continued riding on a potentially compromised load-bearing structure an unnecessary risk. Suspected structural impact damage calls for stopping rather than completing the route.
A professional assessment becomes especially important when considering a second-hand bicycle whose previous impacts cannot be independently verified.
How to Check a Used Carbon Bike for Damage Before a 30-Minute Test Ride Ends?
Inspect a used carbon bike before riding, verify its history and use the test ride to detect handling or mechanical abnormalities. Thirty minutes can reveal warning signs, but cannot establish that a carbon frame is structurally sound. Any unexplained cracking, suspected impact damage or serious alignment concern should trigger professional evaluation before the bicycle is ridden.
Begin with a clean, stationary bicycle in bright, even lighting. Dirt, protective film and thick paint can obscure defects, so do not rely on a quick photograph or the seller’s assurance that a mark is cosmetic.
Examine the fork crown, head-tube junction, down tube, bottom-bracket area, seat cluster and both sides of the rear triangle. Look for sharp irregular lines, lifted coating, crushed surfaces, unusual bulges and evidence of laminate separation. Pressing gently may reveal an obvious abnormality, but normal-feeling surfaces do not confirm an intact structure.
Paint abrasion and structural cracking cannot reliably be distinguished by line direction alone. Carbon fibres may run in different orientations beneath the finish, and an apparently harmless line could warrant investigation.
Seller transparency is another part of the inspection. Ask about crashes, transport incidents, previous repairs, component replacements and frame repainting. Examine decals and finishing for inconsistencies, and request the frame serial number and relevant purchase documentation. A serial number can help establish provenance, but it does not certify structural condition.
Only test ride a bicycle with no unresolved safety concerns. During a permitted ride, pay attention to steering consistency, braking behaviour and unexpected sounds. Unusual creaking under normal pedalling, unexpected lateral movement or steering that feels imprecise should end the test until the cause is investigated. These symptoms may originate from bearings, wheels or other components rather than carbon damage.
Five checks to document before buying a used carbon bike
- Record the frame identity: photograph the serial number and retain the seller’s stated model, size and purchase documentation.
- Document structural surfaces: take clear photographs of the fork, tube junctions, bottom-bracket area and any existing marks.
- Obtain the crash history: request a written statement covering known falls, impacts, repainting and repairs.
- Record test-ride observations: note any abnormal steering, braking, creaking or movement without deliberately stress-testing the frame.
- Resolve outstanding concerns: obtain a written inspection finding from a qualified bicycle or carbon-composite specialist before purchasing if structural condition remains uncertain.
A specialist may use visual assessment, controlled acoustic inspection or suitable nondestructive testing, including ultrasound where available and appropriate. No single method is guaranteed to identify every possible defect. Inspection costs and capabilities should be confirmed before booking.
Walk away if the frame shows unresolved structural warning signs, the seller conceals known repairs or an inspection is refused despite credible concerns. A professional assessment may be negotiable when the issue is genuinely uncertain and the seller is cooperative.
Once condition is reasonably established, the next decision is whether carbon or aluminium better suits the actual road environment and maintenance expectations.
Which Should You Choose: Carbon or Aluminium if Your Roads Are Full of Potholes?
Choose carbon if the specific bicycle has suitable load ratings, generous tyre clearance, sound construction and a maintenance routine you can follow. Choose aluminium if purchase cost and straightforward ownership are stronger priorities. Neither material automatically handles potholes better: frame design, wheel strength, tyres, rider technique and impact severity all influence durability.
Aluminium and carbon composites have different damage mechanisms. Aluminium frames can develop dents, cracks or fatigue damage, particularly around stressed regions. Carbon structures can experience local fibre fracture, resin cracking or delamination. Both materials can develop serious damage, and neither offers a guarantee that every defect will be visibly obvious.
A properly engineered carbon endurance frame may provide desirable stiffness characteristics alongside clearance for higher-volume tyres. An aluminium endurance bike can offer similarly useful geometry and tyre capacity. Comparing material alone overlooks the factors most likely to affect daily riding.
For a 95 kg rider, the evaluation should include the wheels and tyres as well as the frame. Suitable wheel load ratings, spoke configuration, wheel build quality and serviceability are particularly relevant on roads with repeated sharp impacts.
The ownership trade-offs become clearer when compared directly.
| Decision factor | Carbon | Aluminium |
|---|---|---|
| Purchase cost | Often a higher initial investment for comparable positioning | Frequently offers more affordable options |
| Impact damage | Internal damage can be difficult to detect | Denting may be visible, but cracks can still be missed |
| Repairability | Some damage can be assessed and repaired by carbon specialists | Structural repair may be impractical or uneconomical |
| Rough-road comfort | Depends on design, tyre volume and pressure | Also depends on design, tyre volume and pressure |
| Resale | Condition and documented history can strongly influence buyer confidence | Condition, specification and market demand remain important |
| Maintenance approach | Particular care with impacts, clamping and inspection | Regular fatigue, corrosion and impact inspection remains necessary |
Total system weight is a purchasing specification, not a footnote. The Trek manual’s Condition 1 road-bike guidance lists a 125 kg limit including rider, bicycle and gear or cargo. That value applies only within the manufacturer’s stated scope and must not be transferred to unrelated models.
A 95 kg rider must therefore add the bicycle and everything carried when assessing a manufacturer’s applicable limit. Wheel, tyre, seatpost and other component restrictions must also be respected, even if the complete bicycle appears to have sufficient capacity.
A higher spoke count may be appropriate in some wheel designs, but spoke number alone does not establish strength. Rim construction, spoke tension, hub design and manufacturer ratings matter together. Similarly, the word « endurance » in a product description is not a substitute for verified specifications.
Regardless of the frame selected, incorrect assembly can introduce avoidable structural risk, especially where carbon components are clamped.
The Over-Torque Mistake That Can Crack a Carbon Seatpost in 10 Seconds
A carbon seatpost can be damaged during a single incorrect tightening operation when clamping force exceeds what the component is designed to tolerate. Excess compression can cause resin damage, fibre failure or permanent deformation before the bicycle is ridden. The ten-second scenario illustrates how quickly installation damage can occur, not a scientifically established failure time.
A seatpost clamp works by creating enough friction to prevent movement without crushing the underlying structure. Carbon laminates are engineered for particular load directions; excessive local compression and shear can exceed their allowable limits.
Tightening a bolt until it feels secure is not a dependable approach. Thread condition, bolt size, lubricant and tool leverage affect the relationship between perceived effort and actual clamping force.
Use an appropriate, calibrated torque wrench and the exact component instructions. Manufacturer specifications may differ between seatposts, clamps, stems and handlebars. A torque value printed on one component must not automatically be applied to its replacement or to an adjoining part.
A torque wrench is the only reliable method of determining correct tightness.
Several installation mistakes deserve particular attention:
- Incorrect assembly compound: carbon assembly paste can increase friction in locations where the relevant manufacturer permits or specifies it. It must not be applied universally. Trek’s stem instructions, for example, prohibit grease or assembly paste on the stem or steerer tube in the stated application.
- Insufficient seatpost insertion: respect the frame and seatpost insertion requirements rather than relying on the exposed marking alone.
- Incompatible clamp design: use the clamp, shim and hardware approved for the specific carbon post and frame.
- Repeated tightening to stop slipping: investigate fit, contamination, component compatibility and installation rather than progressively exceeding the prescribed torque.
The same discipline applies to carbon handlebars, stem interfaces and compatible accessory clamps. Derailleur fastening requirements should also follow the instructions for the particular component and frame interface, rather than being treated as identical to seatpost clamping.
Keep a simple maintenance record showing component model, specified torque, installation date and any relevant assembly instructions. This is more reliable than memorising a generic torque figure.
With structural condition and correct assembly addressed, tyre selection becomes one of the most practical ways to improve how the bike handles rough pavement.
Fix Harsh Road Buzz by Switching Tyre Width and Dropping 10 psi
Wider tyres operated at an appropriate lower pressure can reduce road vibration before it reaches the frame and rider. Moving to a larger compatible tyre may allow a meaningful pressure reduction, but dropping exactly 10 psi is not universally appropriate. The correct pressure depends on total riding weight, tyre construction, rim dimensions, road conditions and equipment limits.
Chipseal and rough asphalt create repeated small impacts. A tyre that can deform around surface irregularities helps limit the vibration transmitted through the wheels, frame, saddle and handlebars.
At 95 kg, choosing pressure from a generic chart intended for a lighter cyclist may produce excessive tyre deformation or inadequate support. The relevant measurement is equipped rider weight combined with bicycle weight and carried equipment.
In practice, tyre volume should be considered before pressure fine-tuning. If a frame supports a wider tyre safely, increasing volume can create more room to balance cushioning, support and rolling behaviour.
A useful starting method is to enter the relevant measurements into a wheel manufacturer’s pressure calculator. The ENVE tyre-pressure recommendations account for factors including equipped rider weight, tyre volume, internal rim width and riding surface. ENVE also advises considering greater tyre volume when a recommended pressure approaches the rim’s maximum rating.
Ten psi is a test scenario, not a guaranteed safe adjustment. For example, a rider considering a reduction after changing tyre width should first establish a valid starting pressure for the new configuration. The difference between two properly calculated settings may be greater or smaller than 10 psi.
Too little pressure can cause pinch flats with tubes, excessive casing deformation, instability or rim strikes over potholes. Tubeless systems remove the conventional tube pinch-flat mechanism, but they do not eliminate rim damage or tyre-support concerns.
The lower usable pressure limit is therefore equipment-specific. Rim internal width, hooked or hookless construction, tyre casing, tyre size and manufacturer compatibility requirements can all affect the permissible range. Never exceed the lowest applicable maximum pressure, and do not assume that a wider tyre automatically permits any desired reduction.
For practical testing, keep other variables consistent. Compare comfort, steering precision, cornering confidence and signs of rim contact over familiar surfaces while remaining within approved operating limits. Avoid interpreting a single unusually smooth or windy ride as conclusive evidence.
Only after optimising tyre fit and pressure should additional changes such as handlebar tape, rim selection or alternative frame compliance become priorities.
The remaining question is how much additional tyre width is worthwhile when coarse chipseal makes up most of the route.
Which Should You Choose: 25 mm or 28 mm Tyres if You Ride 70% Chipseal?
For a 95 kg cyclist spending 70% of riding time on chipseal, a quality 28 mm tyre is generally the more practical starting choice when the frame and rims accommodate it. Additional air volume can help manage vibration and surface irregularities. However, casing construction, actual installed width, pressure and puncture resistance may matter more than the nominal 3 mm difference.
Chipseal uses coarse aggregate embedded in a binding surface. Its texture generates continuous vibration and may expose tyres to sharp stones or irregular edges. A narrow, heavily inflated setup can transmit more of this disturbance to the rider.
On smooth roads, a narrower tyre may have aerodynamic or other advantages in a suitable wheel-and-tyre configuration. On coarse pavement, vibration-related losses and the ability to maintain traction complicate the comparison. It would be misleading to claim that every 28 mm tyre is faster than every 25 mm tyre.
Tyre construction can reverse a simple width-based recommendation. A supple performance casing may roll comfortably but provide less protection against cuts than a reinforced tyre. A protective casing may resist certain punctures better while adding weight or stiffness.
The useful comparison is therefore between complete tyre options, not two width labels in isolation.
| Criterion | 25 mm tyre | 28 mm tyre |
|---|---|---|
| Air volume | Lower with otherwise comparable construction | Higher with otherwise comparable construction |
| Rough-surface comfort | May require greater pressure for adequate support | Often allows greater cushioning at an appropriate pressure |
| Frame compatibility | May suit older, tighter-clearance road frames | Requires confirmation of actual installed clearance |
| Puncture protection | Depends on casing, tread and inflation | Also depends on casing, tread and inflation |
| Primary attraction | Fit with restricted-clearance setups | Greater potential for balancing support and comfort |
Tyre labels are nominal sizes. A tyre marked 28 mm may measure differently once installed and inflated, depending on its construction and the rim’s internal width. Verify the tyre and wheel compatibility information and measure clearance at the fork, stays and brakes using the bicycle manufacturer’s requirements.
For heavier riders encountering loose fragments or sharp aggregate, a puncture-protected casing may be worth some additional weight or reduced suppleness. That does not make the thickest tyre automatically preferable: excessive casing stiffness can undermine the comfort benefit of extra volume.
Where clearance permits tyres larger than 28 mm, their suitability can also be evaluated rather than treating 28 mm as a universal upper limit. The bicycle’s approved tyre dimensions remain decisive.
Once tyre width and casing are selected, the next reliability decision is whether to run them tubeless or with an inner tube.
Which Should You Choose: Tubeless or Latex Tubes for Long Weekend Rides?
Tubeless is often the more convenient option for long rough-road rides when the rider values automatic sealing of small punctures and is willing to maintain the system. Latex tubes can offer efficient rolling performance and straightforward replacement, but lose air more quickly and do not normally self-seal. Neither setup eliminates roadside repair requirements or compatibility constraints.
Tubeless systems use compatible tyres and rims with liquid sealant inside the tyre. Small punctures may seal without stopping, although success depends on puncture size, location, sealant condition and tyre pressure. A large cut, damaged bead or compromised rim can defeat the system.
Latex tubes are flexible and can deliver low rolling resistance, making them attractive for performance-oriented riding. Their greater air permeability means pressure checks and reinflation are particularly important. Installation also requires care because the material can be caught or pinched between the tyre bead and rim.
The trade-offs are clearer when failure recovery is considered alongside rolling performance.
| Factor | Tubeless | Latex tubes |
|---|---|---|
| Small punctures | Sealant may close them automatically | Usually require tube repair or replacement |
| Large cuts | May require plugs, patches or a replacement tube | May require tube replacement and tyre booting |
| Routine care | Check sealant condition, seating and pressure | Check pressure frequently and inspect tube condition |
| Roadside servicing | Can be messy or difficult after significant damage | Familiar tube-changing procedure, with careful handling |
| Rolling performance | Can be efficient with a suitable tyre and setup | Can be efficient with a suitable tyre and setup |
Air retention is not evidence that tubeless sealant is still active. The Schwalbe tubeless sealant maintenance instructions state that its Doc Blue sealant remains effective for roughly 2,000 km or 2–7 months, depending heavily on temperature. These figures are specific to the stated product and should not be treated as a universal sealant replacement interval.
Schwalbe also recommends refreshing sealant before a major event or long trip. A tyre can continue holding air even after the remaining sealant no longer offers useful puncture protection.
For a 95 kg cyclist on rough rural roads, a sensible tubeless strategy is to carry compatible tyre plugs, a usable spare tube, inflation equipment and a way to address a damaged tyre casing. A butyl spare may be simpler to handle at the roadside, while a latex spare is an alternative when installed carefully and appropriately protected.
During the week before an important ride, check the sealant against its product instructions, inspect tyre cuts, confirm bead seating and verify that valve cores function correctly. Also ensure the selected tyres and rims are explicitly approved for the intended tubeless configuration.
A complete system’s rotating weight should be compared using its actual tyre, tube or sealant, valve and rim configuration. Tubeless is not automatically lighter, and small theoretical performance differences may matter less than dependable roadside recovery.
With a reliable tyre system established, speed improvements can be pursued without compromising the bicycle’s suitability for damaged road surfaces.
Key takeaways before pursuing more speed
- Keep the position controllable on rough pavement; aerodynamic improvements are not worthwhile if they compromise braking, steering or sustained comfort.
- Measure performance changes under comparable conditions rather than relying on claimed speed gains or equipment appearance.
- Prioritise adjustments that preserve the bike’s approved load limits, component compatibility and established tyre setup.
How to Gain 1–2 km/h Average Speed With Aerodynamics Without Buying Deep Wheels
Improving riding position, reducing loose clothing and simplifying exposed equipment can lower aerodynamic drag without purchasing deep-section wheels. A 1–2 km/h increase in average speed is possible under favourable conditions, but it is not guaranteed. Baseline speed, terrain, wind, power output and the rider’s ability to sustain the new position all influence the result.
At higher speeds on relatively flat roads, aerodynamic resistance is a substantial component of cycling effort. The benefit of reducing drag becomes more relevant as speed increases. On steep climbs or routes dominated by repeated braking and acceleration, the same position change may have a much smaller effect on average speed.
Consider two hypothetical riding conditions: a cyclist travelling steadily near 35 km/h on open flat roads and another averaging 25 km/h over a hilly route. The first generally has more opportunity to benefit from aerodynamic refinement, but neither rider can assume a specific speed increase without testing.
Riding position is the first variable worth investigating. A lower front end can sometimes reduce frontal area, while forearm orientation, shoulder width and torso posture can also influence drag. Simply lowering the handlebar is not always the best adjustment.
13.9% lower measured drag
In a controlled wind-tunnel investigation, riding on the hoods with horizontal forearms produced this reduction relative to the study’s reference hoods position. The result is specific to the experimental configuration and does not establish a universal outdoor speed gain.
Wind-tunnel study of cycling posture and aerodynamic drag, published in 2015.
The investigation examined nine riding postures with the cyclist aligned to the airflow at zero yaw. Keeping equipment constant helped isolate posture effects, but the study did not test every body type, rough-road condition or riding environment.
For a 95 kg rider on broken pavement, the aerodynamic position must remain sustainable. Excessively lowering the front end may change weight distribution, increase hand pressure or reduce the ability to absorb impacts. Shorter reach, altered forearm positioning or modest stack adjustments should be evaluated within a suitable bike fit rather than pursued solely for a lower silhouette.
A practical sequence prioritises changes by cost, compatibility and potential impact:
- Refine posture: explore a comfortable, controllable position with appropriate professional fit advice.
- Reduce clothing movement: select well-fitting garments that do not flap excessively in the wind.
- Simplify exposed accessories: remove unnecessary front-end clutter without sacrificing essential lighting, navigation or safety equipment.
- Evaluate cockpit changes: consider a compact handlebar or compatible integrated arrangement only if fit and manufacturer requirements are satisfied.
- Review luggage placement: compare secure, practical storage arrangements rather than assuming a saddle bag, bottle-mounted accessory or hidden storage position is always aerodynamically superior.
An integrated stem or one-piece cockpit is not inherently lighter, faster or better value. It may also reduce adjustment flexibility and introduce replacement or compatibility costs. Such changes should follow, not precede, evidence that the existing setup limits a useful riding position.
To assess progress, perform repeated efforts on the same suitable route while accounting for wind, traffic, temperature and fatigue. A power meter can help compare speed at similar output; more advanced aerodynamic testing may estimate changes in drag area, commonly expressed as CdA. Neither method eliminates environmental uncertainty.
The objective is to maintain higher speed at a comparable sustainable effort, not to force a posture that increases discomfort or reduces safe control over potholes.
Start with one reversible change—such as clothing fit or a modest, professionally evaluated posture adjustment—then repeat comparable rides. Keep the modification only if it improves performance without sacrificing comfort, handling or equipment safety.
Is a 95 kg rider too heavy for a carbon road bike?
No universal carbon-frame weight threshold applies. Suitability depends on the specific bicycle and component ratings. Add rider weight, the bicycle and carried equipment, then check the manufacturer’s applicable total system weight limit and any separate wheel or component restrictions.
Does a lifetime carbon frame warranty cover crash damage?
Do not assume that it does. Warranty terms differ by manufacturer, product, ownership status and jurisdiction. Manufacturing defects, accidental damage, crash-replacement arrangements and transferability may be treated separately. Obtain the written terms applicable to the exact model and country before purchasing.
Can a repaired carbon frame be safe to ride again?
Some carbon damage can be assessed and repaired by qualified composite specialists, but repairability depends on its location, extent and the frame’s construction. A repair’s acceptability should be supported by an appropriate technical assessment and documentation, not appearance alone. Manufacturer restrictions and warranty consequences also need checking.
Should a heavier cyclist always choose more spokes?
No. Spoke count is only one aspect of wheel construction. Rim strength, spoke type and tension, hub design, assembly quality and manufacturer load ratings are also relevant. A properly engineered wheel with fewer spokes may be suitable, while a poorly built wheel with more spokes may still be problematic.
How often should a carbon road bike be inspected for damage?
Follow the bicycle and component manufacturers’ inspection and service instructions, adjusting maintenance attention to conditions and usage. Examine the bicycle after relevant impacts and whenever new damage or unusual behaviour is noticed. Suspected structural carbon damage warrants stopping use and obtaining qualified assessment rather than waiting for the next scheduled service.