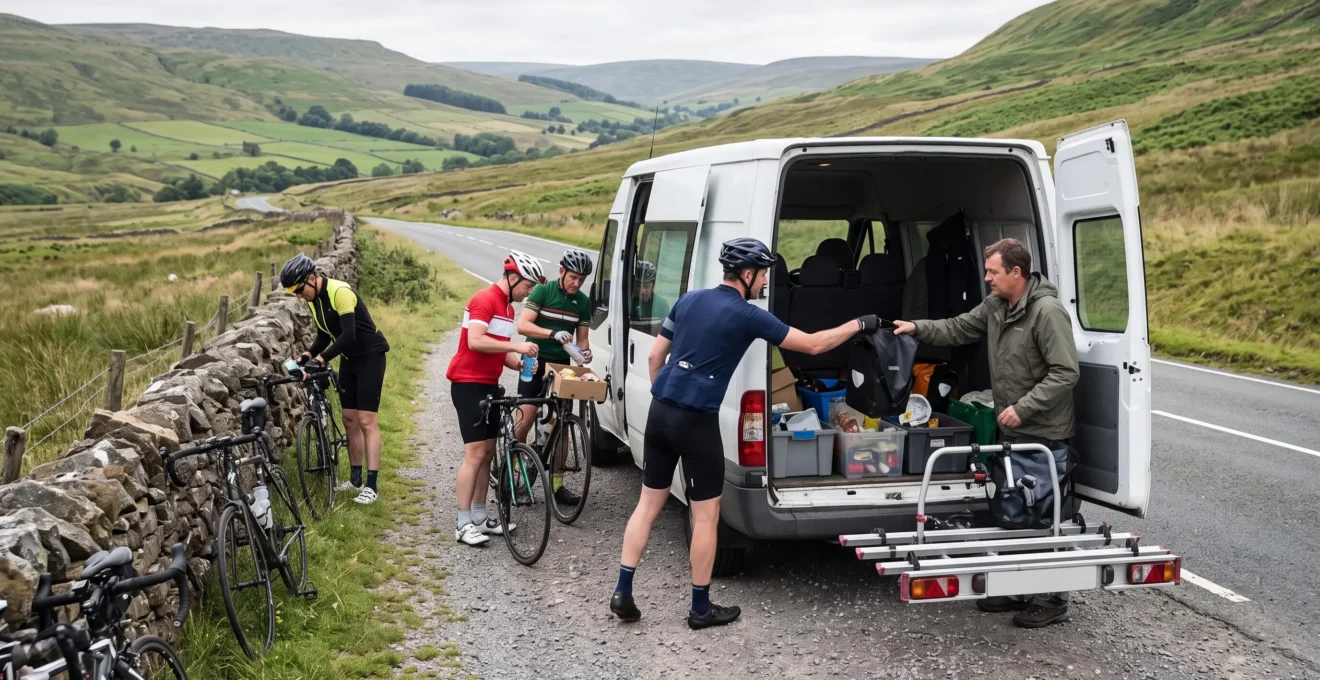
A shuttle vehicle can make a point-to-point cycling tour considerably easier to manage, but only when its responsibilities are clearly defined. Moving luggage between overnight stops, supplying riders along the route and collecting someone who cannot continue are three different operations. Treating them as one continuous vehicle escort can create unnecessary waiting, detours and uncertainty.
For a group of five riding 60–100 km per day, the critical question is not simply whether a support vehicle is available. It is where the vehicle needs to be, when riders actually need access to it, and what happens when the original schedule breaks down.
The most practical arrangement combines a realistic daily route, carefully chosen rendezvous points, organized equipment and a written recovery procedure. A vehicle should remove logistical burdens rather than introduce additional appointments that everyone must meet. That distinction determines whether support saves time or consumes it.
Point-to-Point Cycling Shuttle: The Essentials
- Separate daily luggage transfer from optional resupply and emergency extraction. Not every support function requires a scheduled meeting.
- Choose vehicle-accessible rendezvous locations, communicate arrival windows and establish a missed-stop protocol before departure.
- Organize the vehicle for quick stationary handovers, verify safe bicycle transport and audit emergency extraction access along the entire route.
- Why ‘Support’ Can Make a Cycling Trip Slower Than Riding Self-Contained
- How to Plan 3 Rendezvous Stops a Day Without Anyone Getting Lost
- Professional Shuttle Service or DIY Support Car for a Group of Five: The Decision Grid
- The Loading Mistake That Can Crack a Frame in the First 10 Minutes
- How to Cut Support-Stop Time to Around 5 Minutes With a Simple Vehicle Layout
- Fix a Route That Looks Perfect on Maps but Has No Bailout Options
- When a Quick Link and Spoke Key Actually Belong in a Shuttle-Supported Trip
- Which Type of Cycling Tour Fits You if You Want 60–100 km Days Without Stress
Why ‘Support’ Can Make a Cycling Trip Slower Than Riding Self-Contained
A support vehicle can slow a cycling tour when every rider must synchronize with the driver several times a day. Waiting for late arrivals, leaving the route to reach parking areas and repeatedly handling equipment all consume time. If these interruptions outweigh the effort saved by transferring luggage, the supported tour can become slower than riding independently.
The hidden expense is synchronization overhead. A stop that looks like a short water refill on the itinerary may involve several separate delays: locating the vehicle, reaching a suitable parking area, assembling riders travelling at different speeds, finding supplies and returning to the route.
Three support functions need separate operating rules:
- Luggage transfer: moving overnight bags between accommodations. This normally requires a pickup and delivery each day, not repeated roadside meetings.
- On-route assistance: delivering additional water, food, clothing or mechanical equipment when the group’s needs justify an encounter.
- Emergency extraction: collecting a rider who cannot safely continue, subject to accessible roads, vehicle capacity and an agreed emergency procedure.
These distinctions matter because a luggage-transfer vehicle may not be available beside the riding route. Adventure Cycling’s tour support FAQ explains that its van-supported vehicles may travel different roads from cyclists and remain unseen between overnight locations. Riders therefore need to carry their daily essentials.
Measure the actual cost rather than assuming support is efficient. On a test day, record departure and arrival times, riding time, planned breaks, vehicle-related waiting and off-route detours. Compare this with a reasonably comparable self-contained riding scenario, allowing for differences in carried weight and conditions.
Hypothetical Example: Where Two Hours Disappear
Consider a five-rider group with three support meetings. Each meeting involves 15 minutes of additional waiting, 10 minutes reaching and leaving the meeting point, and 15 minutes handling bags and supplies. That creates 40 minutes of support-related overhead per meeting, or two hours across the day.
This is an illustrative calculation, not measured touring data. It shows why total elapsed time matters more than the apparent duration of an individual stop.
As an operational decision rule, investigate any test day where support adds more than 30 minutes of avoidable waiting and detours, or where coordination overhead exceeds approximately 10% of the elapsed day. These are suggested planning triggers, not established industry benchmarks.
Viewpoints and cafés are attractive meeting places, but their appeal should not override vehicle accessibility or route continuity. Schedule scenic breaks for riders; reserve vehicle meetings for locations that perform a genuine logistical function.
Once support overhead is visible, the next task is to replace vague meeting arrangements with precise rendezvous procedures.
How to Plan 3 Rendezvous Stops a Day Without Anyone Getting Lost
Plan three rendezvous stops by selecting locations accessible to both cyclists and the support vehicle, assigning arrival windows rather than exact meeting times, and sharing the same location information with everyone. Each stop also needs an explicit missed-arrival procedure. Three meetings should be treated as a planning option, not a mandatory daily target.
Start by plotting the full cycling route and the vehicle’s permitted road network separately. A location that is convenient for a driver may be difficult or dangerous for cyclists to reach, particularly near divided highways, complex junctions or one-way traffic systems.
Evaluate each candidate against four criteria:
- Route continuity: riders can reach and leave the stop without a significant detour or unsafe manoeuvre.
- Legal, safe parking: the support vehicle can stop without blocking traffic, cycle facilities or access points.
- Reliable communication: phone coverage is available, or a tested alternative communication method is established.
- Natural pacing: the stop falls after a demanding climb, before a remote section or at another logical resupply point.
Reject locations that fail two or more criteria. Treat unsafe cyclist access or unlawful parking as individual deal-breakers, even if the remaining criteria are satisfied.
Next, replace fixed appointments with arrival windows. In an illustrative schedule, the vehicle might be ready at Stop A from 10:20 to 11:00, Stop B from 12:40 to 13:20 and Stop C from 15:00 to 15:40. These are hypothetical windows, not recommended universal timings.
The driver should know what happens when someone arrives outside a window. For example, the team might agree that the vehicle moves to the next location after a defined cutoff, while a delayed rider reports their position and continues only if it is safe.
Use a shared tracking application where connectivity permits, alongside an offline route file and written contact protocol. Tracking is helpful for coordination but cannot replace a procedure for areas without mobile service.
Each rider should know the last confirmed meeting point, the next designated meeting point and the agreed action if communication fails. A missed check-in must not automatically be interpreted as a routine delay, especially where there are safety concerns.
The group’s planning document should specify who initiates contact, who remains available to respond, and under what conditions an emergency response is required. Never make a stranded rider travel toward an unsafe road merely because the vehicle has relocated.
Five Checks Before Approving the Rendezvous Plan
- Verify the cyclist and vehicle approaches for each stop; produce a shared map with confirmed access points.
- Check parking restrictions and safe stopping space; record one approved vehicle position per stop.
- Test communication coverage where practical; create a written fallback instruction for each unreliable section.
- Assign arrival windows and vehicle departure cutoffs; publish a single daily timetable.
- Confirm the missed-stop and emergency escalation procedures with all five riders and the driver; save an offline copy accessible to everyone.
Keep the final timetable simple enough to consult from a phone. A complex spreadsheet is less useful than a reliable route, clear coordinates and a known response to delays.
Even the best meeting plan depends on the person responsible for operating the support vehicle, which makes the choice between a professional service and a DIY driver consequential.
Professional Shuttle Service or DIY Support Car for a Group of Five: The Decision Grid
A professional shuttle is generally the better operational fit when all five cyclists want to ride every day and dependable luggage transfer is the priority. A DIY support car offers more direct control over supplies and changing plans, but requires a qualified, insured driver and removes that person from the riding group. A hybrid arrangement may preserve more riding time.
For a five-person group, the driver decision matters as much as vehicle rental or service charges. If one of the five riders operates the support car, only four can ride together that day. If everyone intends to cycle, the DIY model requires an additional driver or a rotation agreement.
The comparison should cover the complete service, rather than the vehicle price alone.
| Decision criterion | Professional shuttle | DIY support car |
|---|---|---|
| Who drives? | Operator-supplied driver, if included in the booking | Group member or separately arranged driver |
| Riding participation | All five can potentially ride | One cyclist misses riding time unless a sixth person drives |
| Bike transport | Confirm carrier capacity and handling terms | Group must source compatible equipment and manage loading |
| Insurance | Verify operator coverage and exclusions | Check driving, rental and bicycle-transport coverage |
| Route knowledge | May offer local expertise; confirm coverage area | Depends on the designated driver’s preparation |
| Schedule flexibility | Subject to contracted service windows | Potentially flexible while the driver remains available |
| Total cost per rider | Quoted service price plus applicable extras, divided among riders | Vehicle, fuel, parking, insurance, driver expenses and other applicable costs, divided among riders |
| Emergency pickup | Only when specifically included and operationally available | Depends on driver location, capacity and access |
Driver rotation can appear fair on paper, but it introduces different cycling distances for each participant and may create awkward vehicle handovers. On mountainous or unfamiliar routes, the next driver’s meeting location may be far from where the group finishes riding.
A hybrid model avoids some of these constraints. Book a professional service for luggage transfers and agreed start/end transfers, then ride independently between accommodations. Riders carry enough water, food, clothing and repair equipment for the day.
However, luggage transfer is not an emergency pickup contract. Ask the operator whether same-day extraction is offered, under what conditions and from which roads. If extraction is unavailable, identify other emergency arrangements before departure.
When vetting a provider, request written answers about maximum bike capacity, rack or trailer design, driver positioning, replacement arrangements if the vehicle breaks down, and any surcharge or restriction for early or late collections.
Compare complete written quotations rather than assuming one model is always cheaper. Prices depend on the destination, number of days, driving distances, support hours and services included; the supplied evidence does not establish a general cost advantage.
Whichever model is selected, the vehicle’s ability to transport bicycles safely becomes particularly important when a rider needs mechanical assistance or cannot finish a stage.
The Loading Mistake That Can Crack a Frame in the First 10 Minutes
One of the most serious bicycle transport mistakes is clamping an unsuitable frame tube or allowing bicycles to rub against each other during vehicle movement. Carbon components deserve particular attention because an incompatible clamp can cause structural damage. A secure-looking installation is not proof of compatibility, and the first short drive should be followed by a load inspection.
A support vehicle can carry bicycles on a rear-mounted rack, roof system, trailer or inside a van. Every configuration introduces different contact points, securing requirements and clearance risks.
Before loading, inspect the bicycle manufacturer’s transport guidance and the rack manufacturer’s instructions. Confirm whether the intended contact points can safely take the carrier’s clamping forces. In particular, Trek owner’s manual transport precautions warn that clamping devices can damage frames and that carbon-fibre tubes must not be clamped unless they are specifically designed to accept such forces.
Do not assume that padding makes an otherwise incompatible clamp acceptable. Padding can reduce rubbing at permitted contact points, but it cannot override structural limitations or manufacturer instructions.
Build the loading process around the actual carrier design:
- Check each bicycle’s permitted support and attachment points, particularly on carbon frames and forks.
- Position bicycles so handlebars, pedals and other protruding components cannot strike adjacent frames. Alternate orientation where the rack design permits.
- Protect rubbing points with compatible materials without interfering with clamps, restraints or safety mechanisms.
- Secure bicycles, wheels and removable accessories according to carrier instructions. Store detached components so they cannot move around.
- Verify rack locks, straps, load limits, lighting visibility, number plates and vehicle clearances as applicable.
Then carry out a short initial drive and reinspection. A 10-minute check is a practical planning choice, not a scientifically established damage window. There is no evidence in the supplied sources that most transport damage happens during the first 10 minutes.
After stopping safely, inspect restraints for settling, verify that bicycles have not shifted and look for new contact marks. Repeat checks when road conditions or equipment movement warrant them.
Different carrying systems also have distinct vulnerabilities. Rear-mounted racks require careful bike separation and load clearance. Roof racks introduce height restrictions. Trailers need attention to load retention and towing requirements. Inside a van, bicycles must be restrained against movement rather than simply leaned against the walls.
Any suspicious impact, frame crack, crushed component or unusual contact mark warrants a proper inspection before the bicycle is ridden again.
Safe transport prevents a support operation from creating the mechanical problem it was meant to solve. Efficient vehicle organization is the next opportunity to reduce delays.
How to Cut Support-Stop Time to Around 5 Minutes With a Simple Vehicle Layout
A support stop can take around five minutes when supplies are organized before riders arrive, each person knows where their belongings are stored, and no bicycle unloading is required. The goal is a stationary, predictable exchange: park safely, distribute prepared items, confirm everyone’s needs and depart. Five minutes is an operational target, not a guaranteed outcome.
Searching for a rain jacket beneath several overnight bags or unloading bicycles to retrieve food can turn a simple handover into a lengthy stop. A fixed loading layout removes that avoidable friction.
Divide the vehicle into clearly defined zones:
- Rider storage: one identifiable bag or bin per cyclist, in the same position throughout the tour.
- Immediate resupply: accessible water, food and spare layers that do not require moving bulky luggage.
- Mechanical equipment: tools, spare parts and a designated repair area kept secure during travel.
- Emergency equipment: first-aid supplies, communication equipment and essential recovery materials accessible without unloading the vehicle.
- Overnight luggage: larger bags secured separately from the items needed during the riding day.
For five riders, assign the driver responsibility for positioning and vehicle safety. Each rider retrieves items from their assigned compartment, while another designated participant can coordinate arrivals if needed. Keep bicycles clear of the vehicle’s working area and avoid blocking passing traffic.
Prepare routine exchanges before reaching the stop. Riders can request water, food or clothing at the previous meeting or through a pre-agreed message system. The driver can then place the requested supplies in the accessible zone while the vehicle is safely parked.
A simple five-minute target schedule might allocate one minute to arrival and safe positioning, two minutes to prepared resupply, one minute to checking rider needs and one minute to completing the headcount and departing. This is an illustrative workflow; medical issues, mechanical work, poor weather or delayed riders override the target.
A so-called rolling handover, where items are exchanged while bicycles or the vehicle are moving, should not be used as a time-saving shortcut. It introduces unnecessary risks to rider control and creates exposure to surrounding traffic.
For example, Britain’s Highway Code rules for cyclists advise cyclists to avoid actions that reduce control and prohibit holding onto moving vehicles. These provisions do not establish a universal ban on every possible handover, but they support choosing a safe, stationary exchange rather than improvising while moving.
Make the handover efficient through preparation, not motion. Choose a legal stopping location with sufficient space, keep the vehicle stationary, and resume only after everyone is ready.
Test the layout with the full group before the tour. If commonly requested items cannot be retrieved without moving unrelated equipment, redesign the storage plan before departure.
However, a fast stop is only useful if the vehicle can reach the agreed location. The route itself needs a separate accessibility audit.
Fix a Route That Looks Perfect on Maps but Has No Bailout Options
A cycling route without vehicle-accessible bailout points cannot provide dependable shuttle extraction, even when it appears ideal on a cycling map. To correct this, identify accessible exits for every stage, verify that a standard vehicle can reach them, and document the pickup procedure. Route quality and emergency accessibility must be evaluated separately.
Cycle-friendly roads, gravel paths and remote trails may be perfectly suitable for riding while offering few practical places for a support vehicle to enter. A nearby road on a digital map does not necessarily connect to the trail, and an apparent track may be unsuitable for a normal car or van.
For each riding day, identify at least two candidate extraction points that can be reached by the intended support vehicle. Treat this as a conservative planning method rather than an externally established minimum.
Each candidate should have a practical access record containing:
- Its location on the cycling route and a clearly identifiable meeting position.
- The road used by the vehicle, including the last suitable turnoff.
- The driving distance and estimated journey time from the nearest main road, checked using an appropriate routing service.
- Known surface, width, access, parking and turning limitations.
- The available communication method and an alternative if mobile reception is unreliable.
Check satellite imagery for road alignment and visible surfaces, and street-level imagery where available for junctions, barriers or restricted access. These tools provide useful preliminary information but cannot confirm current access conditions by themselves.
Before a remote stage, confirm uncertain roads with relevant local contacts such as accommodation hosts, visitor information providers or bike shops. Where the route crosses privately controlled land, obtain any necessary access permission rather than assuming the vehicle may enter.
Official guidance for the Natchez Trace Parkway illustrates the importance of this preparation. The National Park Service‘s bicycle trip-planning advice calls for planning food and water access, checking closures, arranging vehicle parking and preparing for emergencies where phone reception is unavailable. Its advice is specific to that parkway and does not validate access points elsewhere.
A useful design improvement is to let a verified bailout point double as a planned rendezvous stop. This provides both routine resupply and a known emergency meeting location without adding another vehicle appointment.
However, do not force every extraction point to serve as a scheduled stop. Some locations may be accessible yet inconvenient for routine riding. Their value lies in being available when required.
For long vehicle-inaccessible sections, consider whether an alternative cycling route offers a better balance of scenery, riding quality and recovery options. If a rapid extraction is impossible, the group needs an explicit plan appropriate to the terrain and level of isolation, including emergency services where necessary.
Knowing where the vehicle can reach a rider also determines how much mechanical equipment that rider must carry independently.
When a Quick Link and Spoke Key Actually Belong in a Shuttle-Supported Trip
A quick link belongs in a rider’s personal repair kit when a chain failure may need to be resolved before the support vehicle can reach them. A spoke key becomes more valuable on remote stages with limited extraction access, provided the rider knows how to use it. Both decisions depend on distance from support, bailout availability and mechanical competence.
A shuttle-supported cycling tour benefits from a layered repair system. The objective is not to duplicate a complete workshop on every bicycle; it is to keep enough equipment available to manage realistic problems until further assistance becomes accessible.
Divide supplies into three levels:
| Location | Typical contents | Operational purpose |
|---|---|---|
| On-bike kit | Compatible quick link, appropriate multitool, puncture repair items and essential inflation equipment | Resolve common problems without waiting for the vehicle |
| Support vehicle | Broader tool selection, compatible chain parts, spare spokes where practical, repair supplies and selected replacement components | Handle repairs requiring additional equipment or time |
| Overnight base | Nonessential maintenance equipment and larger service supplies | Carry out planned inspection or more involved maintenance off-route |
The quick link is particularly relevant where the route has long intervals without accessible roads. A compatible replacement link and suitable chain tool may allow a trained cyclist to restore a damaged chain sufficiently to continue, subject to the condition of the chain and drivetrain.
Near a planned support meeting, a vehicle carrying a suitable replacement chain and tools may offer a better repair environment. Still, a close vehicle is not necessarily an available vehicle: the driver may be transporting luggage elsewhere or unable to access the cyclist’s location.
A spoke key addresses a different problem. A damaged or broken spoke may allow a wheel to move out of true, potentially causing brake or frame clearance problems. Correct spoke-key sizing, wheel knowledge and careful adjustment matter; inappropriate tensioning can make the problem worse.
Carrying a spoke key does not mean every damaged wheel can safely be repaired roadside. Significant wheel deformation, structural damage or uncertain clearance should lead to stopping and arranging appropriate assistance.
Before each stage, assess two variables: the greatest practical separation between riders and accessible vehicle support, and the difficulty of reaching a designated bailout point. The more remote or inaccessible the route, the stronger the case for additional compatible personal repair equipment and mechanical preparation.
For an isolated stage, riders may also need more reliable navigation, communication and emergency supplies. Tool selection should follow actual route exposure rather than merely the presence of a support van somewhere in the region.
Once the support vehicle, extraction plan and equipment responsibilities are settled, the remaining decision is whether the chosen touring format matches the group’s desired daily mileage and riding experience.
Key Takeaways Before Choosing Your Tour Format
- Preserve group riding time by deciding whether all five participants must cycle every day or whether driver rotation is acceptable.
- Evaluate support availability separately from luggage movement; carrying less weight does not automatically provide roadside assistance.
- Set daily distance only after accounting for elevation, individual pace, reliable resupply and accessible recovery options.
Which Type of Cycling Tour Fits You if You Want 60–100 km Days Without Stress
The right cycling tour format for 60–100 km days depends on rider ability, climbing, luggage weight and the amount of logistical responsibility the group wants to retain. Dedicated vehicle support suits groups needing flexible assistance, while luggage-only transfers suit independent riders seeking lighter bicycles. Rotating drivers can work when participants accept unequal riding days.
Distance alone is an incomplete measure of difficulty. A 70 km route with sustained climbing, exposed roads and limited resupply can feel much more demanding than a longer route with easier terrain and predictable stopping opportunities.
Carrying overnight equipment adds weight, particularly noticeable while climbing and accelerating. Transferring that luggage can improve comfort, but it does not remove fatigue from elevation gain, weather, technical terrain or a riding pace beyond a participant’s ability.
Four common formats offer different compromises:
- Fully supported tour with dedicated driver: suited to mixed-ability groups that value flexible roadside assistance, provided the service contract genuinely includes it.
- Hybrid shuttle and luggage transfer: suited to riders who want to carry minimal overnight equipment while remaining independent throughout most of the day.
- Self-guided tour with commercial luggage service: suited to confident navigators who are comfortable managing daily food, mechanical problems and alternative transport.
- Rotating-driver group: suited to participants who accept that one member will drive rather than cycle on an assigned day.
The strongest choice becomes clearer when matched against the group’s composition.
| Rider profile | Suggested format | Why it fits |
|---|---|---|
| Friends with similar pace and good self-sufficiency | Hybrid shuttle or commercial luggage transfer | Preserves independent riding and reduces routine support meetings |
| Group with significant differences in ability | Fully supported tour | Can provide more flexible assistance if the operator offers it |
| Family group with varying comfort and endurance | Dedicated support with verified pickup arrangements | Offers a planned alternative when someone cannot complete the stage |
| Performance-focused riders | Luggage transfer with minimal scheduled stops | Limits interruptions while keeping overnight bags off the bikes |
| Budget-conscious group willing to share driving | Rotating-driver arrangement | Allows DIY support while accepting reduced cycling participation |
Use the 60–100 km range as a starting preference, not a daily obligation. Recalculate each stage using its climbing profile, expected riding speed, road conditions, food and water availability, and time needed for the selected support arrangements.
Before booking a multi-day itinerary, complete a representative test ride with comparable distance, elevation and equipment. If the tour will use luggage transfer, test with the intended day kit. If it will be self-contained, test with the actual loaded bicycle.
Record the complete elapsed day, not merely moving time. This reveals whether the proposed schedule leaves sufficient margin for meals, mechanical interruptions, navigation errors and slower participants.
The next practical step is to choose one representative stage, map its vehicle-accessible meeting and bailout points, confirm the service responsibilities in writing and ride a realistic test day. Use the results to adjust mileage and support frequency before committing the group to the full tour.
Does a luggage-transfer service automatically collect cyclists who cannot finish a stage?
No. Luggage transfer and emergency rider extraction are separate services. Some operators transport bags between accommodations without remaining available along the cycling route. Confirm pickup availability, operating hours, bike capacity, coverage area and additional charges directly with the provider before booking.
Can one support vehicle carry five riders and all their bicycles?
Only if its approved passenger capacity, bicycle-carrying equipment, load limits and applicable legal requirements permit it. A five-rider group may also have a separate driver, so seating needs careful consideration. Verify the exact vehicle configuration rather than assuming a standard van can transport the entire group and its equipment simultaneously.
What should cyclists do if their phones lose signal between rendezvous points?
Follow the pre-agreed offline procedure rather than relying on live tracking. Riders should have downloaded routes, known meeting coordinates and written instructions for delayed arrivals. The plan should distinguish an ordinary missed stop from an emergency and identify when help must be requested through available emergency communication channels.
Should the shuttle follow cyclists along the entire route?
Not necessarily. Continuous proximity can introduce unnecessary driving, synchronization and stopping requirements. For groups that mainly need overnight bag transfers, point-to-point luggage movement may be enough. If rapid roadside assistance is essential, the driver must have an agreed positioning and response plan supported by accessible roads.
What information should every rider receive before the first day?
Each rider should receive the route and elevation profile, planned meeting locations, arrival windows, accommodation details, contact information, available support services and emergency procedures. The information should remain accessible offline. Riders should also know what they must carry independently and which mechanical problems the support vehicle is equipped to handle.