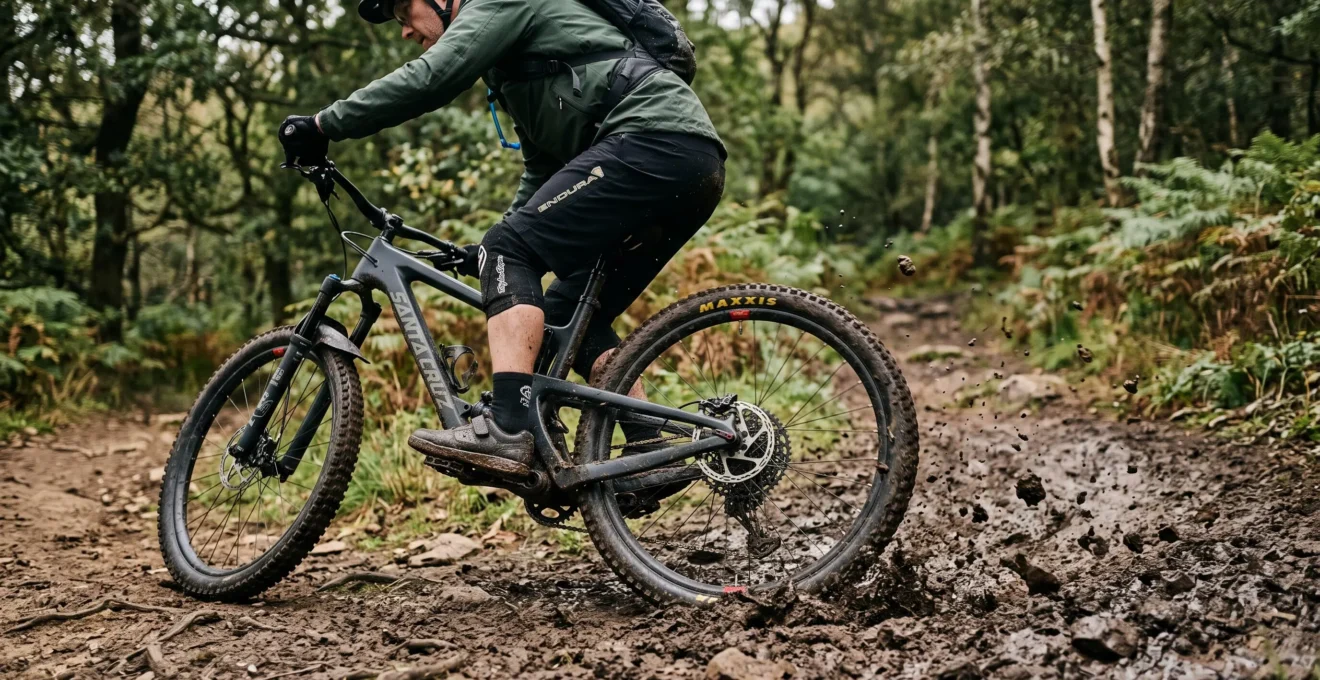
The best knobby mountain bike tyre for mixed mud and hardpack is usually an all-round trail tread with relatively efficient centre knobs, well-supported shoulder knobs and enough spacing to shed the mud you actually encounter. A dedicated mud tyre may offer more bite in deep, soft ground, but its tall, widely spaced knobs can feel vague and waste energy on firm trails.
The important distinction is between maximum grip in one condition and predictable grip across several. A tyre that holds beautifully in wet soil but suddenly lets go on a dry, dusty corner may be less useful than a slightly less aggressive option with a smoother transition onto its shoulder knobs.
Tread is only part of that decision. Rubber compound, casing construction, rim width and inflation pressure all influence how the tyre behaves. Choosing them together matters more than buying the most aggressive-looking pattern. For riders alternating between muddy patches, loose gravel and hardpack, a grippy front tyre paired with a faster rear is often a sensible starting point.
Quick verdict: knobby MTB tyres for mixed trails
- Choose an intermediate tread: moderate centre knobs, supported shoulders and sufficient spacing for your local mud generally balance traction and rolling efficiency.
- Match casing and pressure to the rider: heavier protection is useful for repeated impacts, but unnecessary reinforcement can add weight and reduce suppleness.
- Prioritise controlled cornering: check shoulder wear, rim compatibility and pressure before assuming a more aggressive tyre will solve a sliding problem.
- Why Do Aggressive Knobs Sometimes Slide More on Hardpack Corners?
- How to Choose Tread and Casing if You Ride 70% Hardpack and 30% Mud?
- Which Should You Choose: 2.3 or 2.5 Tyres if Your Trails Have Loose Over Hard?
- The Tyre-Pressure Copying Mistake That Causes Pinch Flats on Roots
- When Should You Replace a Knobby Tyre if the Centre Looks Fine but Corners Feel Loose?
- Which Should You Choose: 130 mm Trail Bike or 160 mm Enduro for Weekend Riding?
- Which Should You Choose: Aggressive Front Tyre and Faster Rear or a Matched Set?
- Which Aggressive Tread Pattern Helps Cornering Without the ‘On-Off’ Grip Feeling?
Why Do Aggressive Knobs Sometimes Slide More on Hardpack Corners?
Aggressive mountain bike tyres can slide more on hardpack because their tall, widely spaced knobs are designed to penetrate loose soil rather than maximise stable rubber contact with firm ground. On hard surfaces, those knobs cannot dig in as deeply and may flex under cornering loads. The result can be less predictable steering than a lower-profile tread provides.
There are two useful ways to think about tyre grip. Mechanical grip comes from the rubber interacting with the trail surface, while tread edges provide additional bite by engaging loose material. These mechanisms overlap, but their relative importance changes with terrain.
In soft mud, tall knobs can penetrate the surface and generate useful traction. On compacted dirt, those same knobs may ride on their tips. Compared with a shorter, more closely supported tread, the tyre can feel less settled as lateral forces build.
Knob support matters as much as knob height. An unsupported shoulder knob can bend as the bike leans. As the load changes, the knob may deform, recover or lose purchase, creating a sensation that grip arrives and disappears abruptly.
Rubber compound complicates the picture. A softer compound can conform more effectively to irregularities in roots and rocks, but it may also increase rolling resistance or wear. Knob geometry and rubber stiffness work together, so neither feature should be judged in isolation.
This balance is reflected in BikeRadar’s mountain bike tyre comparison and buyer’s guide, which distinguishes open, aggressive patterns suited to loose terrain from faster-rolling alternatives intended for firmer surfaces.
Before replacing a tyre that feels nervous in corners, try a controlled comparison on a familiar, low-consequence section of trail. Establish a baseline pressure, then reduce it slightly within the tyre and rim manufacturers’ permitted range. Keep riding speed and line consistent.
If the tyre feels more settled, pressure and contact-patch behaviour may have contributed. That improvement does not prove knob deflection was the cause. If the tyre continues to squirm, check casing support, tread wear and shoulder-knob shape before spending money.
A good mixed-terrain tyre must provide sufficient edges for muddy ground while retaining stable support on firm corners. That requirement becomes particularly important when most of a ride is dry.
How to Choose Tread and Casing if You Ride 70% Hardpack and 30% Mud?
For a riding mix of 70% hardpack and 30% mud, begin with a relatively fast centre tread, pronounced but supported shoulder knobs and a casing suited to your impact risk. Avoid a dedicated deep-mud pattern unless the muddy sections are particularly demanding. The type of mud and severity of the terrain matter more than the percentage alone.
Start by identifying where the tyre spends most of its time. If most climbs, traverses and connecting trails are firm, an aggressive spike-style pattern imposes compromises across much of the route. An intermediate trail tread gives the centre knobs enough support to roll efficiently while keeping meaningful edges available for cornering.
However, not all mud behaves alike. Sticky clay may accumulate between closely spaced knobs, reducing the tread’s ability to bite. An open pattern is more likely to release packed material as the wheel rotates. Damp loam may provide enough traction for a less widely spaced pattern, particularly when the soil remains cohesive.
The following decision grid provides a practical starting point rather than a universal tyre prescription.
| Trail conditions | Tread priority | Casing priority |
|---|---|---|
| Mostly firm, occasional damp patches | Low-to-moderate centre knobs with defined shoulders | Supple trail casing where impacts are limited |
| Hardpack with sticky clay sections | More open spacing for mud clearance | Protection matched to rocks, roots and speed |
| Mixed trails with rough, rocky descents | Supported shoulder knobs for braking and cornering | Reinforced casing where rim impacts are frequent |
| Prolonged wet, soft terrain | Taller, more widely separated knobs | Support and durability appropriate to the riding |
The casing is a separate purchasing decision. A reinforced carcass generally provides more impact protection and support, whereas a lighter construction can feel more compliant and save weight. Additional construction material may also change rolling behaviour, but a heavier casing is not automatically slower in every terrain condition.
Likewise, tread height alone cannot explain all rolling resistance. Schwalbe’s rolling-resistance technical FAQ identifies tyre deformation as a major source of energy loss and explains why tall lugs and large tread gaps can increase resistance. Width, pressure and construction also influence the outcome.
A sensible comparison uses the same familiar loop and records pressure, casing, surface conditions and handling observations. If comparing two casings, keep tread and other variables as similar as possible. Repeat the loop where practical instead of drawing conclusions from one muddy ride.
Once the tread family and protection level make sense, tyre width is the next variable to evaluate. More volume can improve control, but it must suit the wheel and the actual trail.
Which Should You Choose: 2.3 or 2.5 Tyres if Your Trails Have Loose Over Hard?
Choose a 2.5-inch tyre when your loose-over-hard trails demand more volume, braking control and cornering support, provided your rim and frame suit it. A 2.3-inch tyre may be preferable for lighter handling, tighter clearances and long mixed rides. Neither width guarantees more grip: tread shape, casing, pressure and rim compatibility can outweigh the nominal size difference.
Loose-over-hard terrain consists of gravel, dust or small stones over a firmer base. The challenge is maintaining traction when the top layer moves under the tyre. Knobs need to engage the available material, while the casing and contact patch must remain stable as braking or cornering loads build.
A larger tyre can provide greater air volume and allow a different contact-patch shape at an appropriate pressure. That can help the tyre absorb uneven ground and maintain contact. It does not mean the wider tread always cuts through loose material more effectively or provides greater traction.
Width also changes the riding experience beyond cornering. A wider model may weigh more, depending on construction, but width alone does not establish its rolling resistance. On rough surfaces, extra volume and appropriate pressure can improve the way the tyre follows the terrain.
| Decision factor | 2.3-inch tyre | 2.5-inch tyre |
|---|---|---|
| Air volume | Less volume at comparable construction | More volume |
| Handling | Can feel more responsive | Can offer a more compliant feel |
| Loose corners | Depends heavily on tread and pressure | Potential stability benefit with suitable setup |
| Weight | Often lighter in comparable ranges | May carry additional material and weight |
| Compatibility | May suit narrower rims and tighter clearance | Requires appropriate rim, frame and fork clearance |
Rim width is the compatibility check that should come first. A wide tyre on an excessively narrow rim can develop a rounded profile that poorly supports its shoulders. The result may be vague steering even though the nominal tyre width looks ideal.
Check the tyre manufacturer’s recommended rim-width range and the bicycle’s available clearance. Actual measured tyre width can vary between models and rim combinations, so the sidewall number is not a complete fit specification.
Rider characteristics also matter. A heavier rider, more aggressive cornering style or repeated rough descents may justify additional volume and casing support. Someone prioritising acceleration and long, moderate trails may prefer a narrower, lighter configuration.
Before buying either size, confirm wheel compatibility and establish a workable pressure range. An excellent tyre at an unsuitable pressure can feel worse than a less expensive model set up correctly.
The Tyre-Pressure Copying Mistake That Causes Pinch Flats on Roots
Copying another rider’s mountain bike tyre pressure can cause pinch flats because their weight, casing, tyre volume, rim width and insert configuration may differ from yours. A pressure that provides adequate support on one bike may allow another tyre to bottom out against a root or rock. The answer is an individual pressure baseline, adjusted through controlled testing.
Tyre pressure affects both traction and the amount of cushioning available during impacts. With insufficient pressure, the tyre can compress far enough for the rim to strike an obstacle. In a tubed system, the inner tube may be trapped and cut between the rim and tyre. Tubeless systems avoid conventional tube pinch flats but remain vulnerable to casing damage, rim strikes and air loss.
Wet roots make these incidents particularly awkward because they can offer limited grip and present abrupt changes in height. A tyre that deflects sideways or bottoms out at the wrong moment can compromise the rider’s line.
Excessive pressure creates the opposite problem. The tyre becomes less able to conform to uneven ground and may bounce or deflect off roots instead of maintaining steady contact. Raising pressure indefinitely is therefore not a reliable way to improve both protection and traction.
As an illustrative starting point, BikeRadar’s mountain bike tyre-pressure advice gives 21 psi front and 23 psi rear for an 80 kg rider including kit, using 2.4-inch tubeless tyres on rims with 30 mm internal width. Those numbers reflect specific assumptions and are not universal recommendations.
21 psi front / 23 psi rear
An illustrative tubeless trail-riding starting point for an 80 kg rider including kit, with 2.4-inch tyres and 30 mm internal rims. Different riders, casings and terrain require individual adjustment.
BikeRadar, Mountain bike tyre pressure explained, 22 December 2025.
The practical objective is to find the lowest usable pressure that maintains adequate stability and impact protection. Start with a manufacturer-compatible baseline appropriate to your setup, then make small adjustments on a repeatable section of trail. Stop lowering pressure if the tyre begins to roll excessively, the rim strikes obstacles or another sign of instability appears.
Five checks to establish your own MTB tyre-pressure baseline
- Record your riding weight including kit, tyre sizes, casing models and rim internal widths. Keep a written setup record.
- Check the tyre and rim manufacturers’ pressure limits and compatibility guidance. Note the permitted operating range.
- Measure and write down your initial front and rear pressures using the same gauge each time. This becomes your baseline.
- Ride a familiar, manageable loop and record grip, tyre movement and any rim impacts. Keep a short observation log.
- Adjust pressure in small increments, retest and retain the setting that provides stable handling without bottoming out. Save the final pressures and trail conditions.
Repeat the check when changing tyre size, casing, wheel components or riding conditions. Pressure is a setup variable, not a number permanently attached to the rider.
Once pressure is under control, persistent cornering instability deserves a physical tread inspection. Sometimes the tyre has simply lost the shoulder edges it needs.
When Should You Replace a Knobby Tyre if the Centre Looks Fine but Corners Feel Loose?
Replace a knobby mountain bike tyre when its shoulder knobs have lost enough shape or integrity to compromise predictable cornering, even if the centre tread still looks usable. Rounded edges, chipped knobs, cracks at their bases or structural damage deserve attention. Check pressure and setup first, but do not keep riding a damaged tyre simply because its centre retains tread depth.
Mountain bike tyres do not wear uniformly. The rear centre tread is exposed to repeated driving and braking loads, while shoulder knobs experience substantial lateral forces as the bike leans. Front and rear wear patterns differ because they perform different tasks.
A centre tread with visible depth may therefore create a misleading impression of remaining performance. A fresh shoulder knob has a defined shape that helps engage loose soil. Once that edge rounds off, its interaction with the ground changes, particularly in shallow gravel and dusty corners.
Look closely at both sides of the tread rather than judging from directly above. Compare the left and right shoulder rows and look for missing rubber, torn edges, abnormal movement or cracks where knobs join the casing.
Rubber ageing adds another consideration. Sunlight, heat and storage conditions can alter rubber over time. An old tyre may therefore deserve inspection even when mileage is low, although appearance alone cannot establish precisely how much wet grip it has lost.
Schwalbe’s tyre-wear and storage guidance explains that there is no useful universal mileage replacement figure for MTB tyres because riding style strongly affects wear. It also identifies exposed carcass threads or puncture-protection material as clear replacement indicators.
Structural damage should take priority over any grip experiment. If the casing is exposed, sidewalls are compromised or knobs are splitting severely, replace the tyre rather than testing its cornering limit.
For a tyre that remains structurally sound but feels less secure, use a familiar, low-risk corner to compare its handling with your previous observations. Avoid deliberate wet-root or wet-road lean tests near the traction limit; those can create unnecessary crash risk.
Replacing only one tyre can be economical. Since rear tyres commonly experience substantial driving and braking wear, the rear may need replacement before the front. A serviceable front can remain in use after careful inspection, allowing the budget to go where wear is greatest.
Tyre rotation is not automatically advisable. Moving an extensively worn rear tyre to the front may sacrifice the steering grip you most need. Any proposed swap should respect tyre direction, intended front/rear design and actual condition.
The same principle applies to the wider bike setup: choose equipment for the conditions and forces it regularly experiences, not simply for the most demanding riding it might encounter once.
Which Should You Choose: 130 mm Trail Bike or 160 mm Enduro for Weekend Riding?
A 130 mm trail bike is generally the more practical choice for weekend riders spending most of their time on moderate climbs, hardpack and mixed trails. A 160 mm enduro bike becomes more appealing when steep, rough descents dominate the riding. Tyre weight, tread aggressiveness and casing protection should support that choice rather than undermine the bike’s intended character.
Suspension travel influences how a bike handles repeated impacts and demanding terrain, but it does not determine tyre grip by itself. The tyres remain the connection between the bicycle and the ground.
For a typical mixed-trail weekend, a shorter-travel bike equipped with appropriately supportive, efficient tyres can deliver lively handling and useful traction without unnecessary mass. A heavier casing and deep-mud tread may be worthwhile when conditions justify them, but can make an otherwise responsive bike feel sluggish on firm trails.
A longer-travel enduro bike offers more suspension capacity for rough descending. Such riding often places greater demands on tyre support and impact protection, making reinforced casings more attractive. However, extra suspension travel does not eliminate puncture risk or correct an unsuitable tread.
| Consideration | 130 mm trail bike | 160 mm enduro bike |
|---|---|---|
| Typical priority | Mixed rides, climbing and responsive handling | Steep, rough and descent-focused terrain |
| Tyre tread | Versatile, moderate knobs for variable surfaces | More aggressive tread when terrain requires it |
| Casing | Protection balanced against weight and compliance | Additional support for demanding impacts |
| Main compromise | Less suspension capacity on severe descents | Potentially greater weight and climbing effort |
These are tendencies, not fixed rules. Frame geometry, suspension design, wheel choice, rider skill and the tyre combination can substantially affect the result. A well-equipped trail bike may outperform a poorly matched enduro setup on the same moderate loop.
Consider where most of the ride occurs and where equipment limitations actually appear. A rider who climbs for much of the day and encounters only occasional rough sections may benefit more from improved tread and pressure choices than from additional suspension travel.
Conversely, someone regularly riding steep rock gardens and sustained technical descents may have a stronger reason to accept heavier tyres and a more descending-oriented bike.
With the bike’s purpose established, the next decision is how to distribute tyre grip between the front and rear wheels without adding unnecessary rolling resistance.
Which Should You Choose: Aggressive Front Tyre and Faster Rear or a Matched Set?
For predominantly hardpack trails interrupted by muddy sections, an aggressive front tyre paired with a faster-rolling rear is usually a sensible starting point. It prioritises steering grip while limiting unnecessary rear-wheel drag. A matched aggressive set may be preferable for sustained mud, loose terrain and demanding braking, where consistent traction matters more than rolling efficiency.
The front and rear tyres perform different jobs. The front tyre has a major influence on steering confidence and directional control, while the rear must transmit pedalling and braking forces. Both contribute to cornering, but they experience different loading conditions.
A grippier front tyre can provide useful cornering margins. A rear tyre with lower, more closely supported centre knobs may roll more efficiently on firm trails, especially when the rear spends considerable time carrying drive loads.
This is why many mixed-terrain setups use different tread patterns rather than two identical tyres. The choice is not simply aggressive versus fast: it is about preserving a predictable relationship between front and rear traction.
The disadvantage appears when the rear tyre cannot maintain traction where the front can. On wet roots, loose-over-hard corners or soft climbs, the rear may slide earlier. Some riders prefer that behaviour because the front remains secure; others find the difference difficult to manage.
A matched pair can provide a more consistent tread response between wheels, although identical tyres do not guarantee identical grip or simultaneous breakaway. Front and rear loading, pressure and wear still differ.
The decision depends on how much time the trail spends near the limits of the rear tyre. Occasional shallow mud generally favours an efficient mixed combination. Sustained deep mud or repeated steep braking zones may justify more aggressive rear tread and stronger casing protection.
There is also a straightforward budget strategy. If the existing rear tyre is in good condition, fit the more capable front tyre first and evaluate whether steering improves sufficiently. That avoids buying a full set merely because two matching tyres look tidy.
If the rear subsequently struggles for drive or braking traction, change it for a pattern appropriate to that specific problem. Buying in stages produces useful evidence about which component actually improved the bike.
Whichever arrangement you choose, the final test is how smoothly the tyre builds grip as the bike leans. Maximum grip is not particularly reassuring if the transition towards that grip is difficult to read.
Key takeaways before choosing a tread pattern
- Look for a progressive transition: shoulder support and intermediate tread shape matter when moving from upright rolling to cornering.
- Do not judge the pattern alone: compound, casing stability and pressure can change how the same tyre feels.
- Test predictability before purchasing twice: a repeatable corner and setup log can reveal whether a tyre change is necessary.
Which Aggressive Tread Pattern Helps Cornering Without the ‘On-Off’ Grip Feeling?
An aggressive MTB tread with supported shoulder knobs, a usable transition between centre and edge knobs, and a compound suited to the terrain is the best starting point for progressive cornering. Intermediate or staggered knobs can help maintain contact as the bike leans. Avoid judging predictability from knob height alone, because pressure and casing support can change the result significantly.
The unsettling on-off sensation often appears during the transition from upright rolling to leaning. The tyre initially runs on its centre tread, then progressively loads the intermediate and shoulder knobs. If the transition region provides little usable support, the change in grip can feel abrupt.
Patterns with staggered intermediate blocks offer additional tread contact during this phase. Supported shoulder knobs can resist excessive folding, while appropriate siping may allow parts of a knob to conform to surface irregularities. Those features can improve the potential for a progressive feel, although their effectiveness depends on the complete tyre construction.
A softer shoulder compound may improve conformity and traction on smooth rocks or roots. However, soft rubber can wear faster, and overly flexible knobs may move noticeably under hard cornering. More softness does not automatically mean better stability.
Pressure is equally important. Excessive inflation can reduce the tyre’s ability to conform to uneven ground, while insufficient inflation can allow the casing or tread to move laterally. The target is stable, progressive grip, not the lowest possible pressure.
Consider three practical tread families:
- Tightly packed, low-profile patterns: efficient on firmer surfaces but potentially limited when sticky mud blocks the tread gaps.
- Intermediate trail patterns: moderate centre knobs and more pronounced shoulders, offering a useful compromise for mixed conditions.
- Widely spaced, deep-mud patterns: useful for penetrating soft material and shedding mud, but potentially less settled and more resistant to rolling on hardpack.
The appropriate spacing depends on soil consistency. A tyre that clears wet clay effectively may feel unnecessarily aggressive on damp loam, where an intermediate pattern provides enough traction with better hard-surface behaviour.
A repeatable field test is more informative than a marketing description. Select a familiar corner with a safe run-out and ride it consistently, observing whether steering grip builds smoothly or feels abrupt. Make comparisons at controlled speeds rather than progressively increasing lean until traction fails.
Record the surface, pressure, tyre model and your observations. If possible, repeat the comparison under similar conditions. Do not interpret a single corner or one ride as a controlled measurement of grip.
The most economical selection is often an intermediate, well-supported front tread paired with a rear pattern chosen for the actual braking, climbing and mud demands. Keep the existing rear if it remains safe and performs well; upgrade only when a specific limitation is clear.
For the next ride, inspect the current shoulder knobs, verify rim compatibility, establish front and rear pressure baselines and test one familiar section. Those observations will tell you whether you need a different tread, a stronger casing or simply a better setup before spending money on replacement tyres.
Can one MTB tyre handle both sticky mud and dry hardpack?
Yes, an intermediate knobby tread can handle both, but it involves compromise. A relatively efficient centre tread and supported shoulders suit mixed surfaces, while enough space between knobs helps shed mud. Very sticky clay may require a more open tread than occasional damp loam.
Does a softer tyre compound always provide better grip?
No. Softer rubber can conform better to roots and rocks, but overall grip depends on tread geometry, casing, pressure and ground conditions. It can also increase wear or rolling resistance. The right compound balances surface traction with tread stability and durability.
Are tubeless tyres immune to pinch-flat damage?
No. Tubeless tyres eliminate the inner tube and its conventional snakebite punctures, but severe impacts can still damage the casing, rim or bead seal. Correct pressure, appropriate casing protection and a compatible rim remain important.
Should front and rear mountain bike tyres use the same pressure?
Not necessarily. The wheels experience different loading and may use different tyre widths, casings or inserts. Rear pressure is often set higher for support and impact protection, but the correct relationship depends on the rider and setup. Establish each pressure individually within manufacturer limits.
Is a heavier casing worth buying for ordinary weekend trails?
A reinforced casing is worthwhile when repeated rim impacts, cuts or lateral instability justify its added protection. For smoother mixed trails, a lighter casing may offer sufficient durability with better compliance and lower weight. Base the decision on actual damage history and riding conditions rather than assuming maximum reinforcement is always safer or faster.