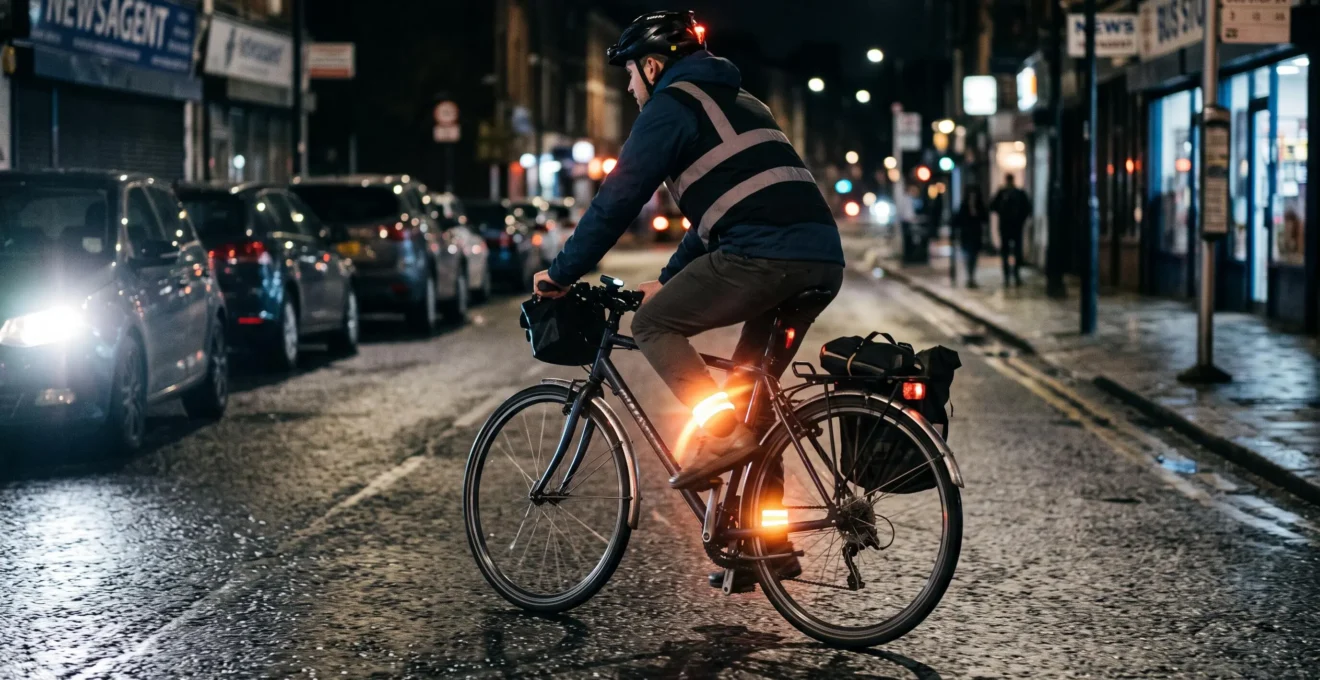
Reflective ankle bands can make a cyclist noticeably easier for approaching drivers to recognise at night than a reflective vest worn alone. Their advantage is not simply brightness. By highlighting the repeated movement of pedalling legs, they provide a recognisable visual pattern that helps distinguish a cyclist from other objects on the road.
Controlled experiments support this advantage, although they do not establish that ankle bands prevent collisions or outperform every reflective vest in every situation. Reflective materials still need suitable illumination and viewing angles, while real traffic introduces rain, glare, competing lights and unpredictable driver attention.
For commuters, the practical choice is therefore not necessarily ankle bands instead of a vest. A more reliable approach combines moving reflectors, static reflective surfaces and properly adjusted bicycle lights. The goal is to help drivers notice a cyclist, recognise what they are seeing and understand where the cyclist is heading, without creating discomfort or excessive glare.
Reflective ankle bands vs vests: the essentials
- Motion improves recognition: research shows that reflective markings on pedalling legs can help drivers recognise cyclists at greater distances than vest-only configurations.
- Placement matters: secure ankle bands where they remain visible, comfortable and correctly positioned, especially over waterproof trousers.
- Combine visibility layers: use suitable front and rear lights, reflective clothing and side-facing reflectors rather than relying on one accessory.
- Why Are Moving Reflectors Seen So Much Earlier Than Reflective Panels?
- How to Wear Reflective Ankle Bands With Waterproof Trousers Without Slipping Off?
- Which Should You Choose: Reflective Ankle Bands or Reflective Tyres for Night Commutes?
- The Reflective Gear Mistake That Leaves You Invisible From Side Streets
- When Should You Add Reflective Motion Gear if Your Route Has Streetlights but Fast Traffic?
- How to Aim Your Front Light So You Can See the Road Without Dazzling Oncoming Traffic?
- Which Should You Choose: A High-Lumen Beam or a Daytime Running Light for City Riding?
- Which Bike Lighting Setup Lets Drivers See You From 150 m Without Blinding Them?
Why Are Moving Reflectors Seen So Much Earlier Than Reflective Panels?
Moving reflectors can help drivers recognise cyclists earlier because they reveal the distinctive movement of pedalling legs. A reflective vest mainly identifies a bright area on the torso, whereas ankle reflectors trace a repeating movement associated with cycling. Research supports this recognition advantage, although moving reflective material is not inherently brighter than stationary material.
Retroreflective material returns incoming light towards its source. When vehicle headlights illuminate a suitable reflective surface, a driver positioned near those headlights can see a bright return. The amount of returned light depends on the material, its orientation, the illumination and the viewing geometry.
Pedalling changes the position and orientation of ankle-mounted reflectors. That can produce variations in apparent brightness, but the more important documented benefit is that the moving pattern provides information about the cyclist’s body and activity. This is known as biological-motion visibility.
A 2022 experimental study on cyclists’ biological-motion visibility examined five reflective clothing configurations and different bicycle-light positions. Fifteen young participants drove on a closed road at night and indicated when they recognised a cyclist pedalling in place.
The researchers found that lower-leg reflective markings improved cyclist recognition distances compared with vest-only conditions. Importantly, the benefit was apparent even when the additional reflective material was confined to the ankles. Bicycle-light placement also influenced the results.
What the 2022 controlled experiment demonstrated
Fifteen young participants encountered a cyclist pedalling in place on a closed road at night. Researchers compared reflective vests, ankle strips and combinations of reflective markings, with a steady white bicycle light mounted in different positions.
Clothing configuration significantly affected recognition distance (p < 0.001). Lower-leg markings improved recognition compared with vest-only clothing, including when markings were placed at the ankles alone. The experiment measured recognition, not actual collision prevention.
Recognition is different from simple detection. A driver might notice an isolated bright reflection without immediately identifying a cyclist. The characteristic motion of ankles and knees helps provide that identity, while a vest adds a larger, relatively stable reflective area that can remain useful when the rider stops pedalling.
Earlier research involving 12 younger and 12 older drivers also found significantly longer recognition distances when a reflective vest was supplemented with ankle and knee markings. The 2012 cycling conspicuity study indexed in PubMed reinforces the value of showing human movement rather than relying exclusively on torso reflectivity.
Neither experiment establishes how much improvement to expect at busy junctions, during heavy rain or under complex street lighting. Drivers may glance towards a cyclist only briefly, and competing light sources can make reflective patterns harder to interpret.
Reflective ankle bands are therefore a useful addition to a vest, especially while pedalling. Their advantage comes from conveying movement and identity, not from guaranteeing greater brightness or visibility from every direction.
How to Wear Reflective Ankle Bands With Waterproof Trousers Without Slipping Off?
Wear reflective ankle bands around the narrowest practical part of the lower leg, over waterproof trousers or a suitable gaiter, and fasten them securely without restricting movement. Choose adjustable fastenings for slippery rainwear, then pedal briefly to confirm that the bands remain in position and the reflective surfaces stay exposed.
Waterproof trousers present a different fitting challenge from ordinary cycling tights. Smooth coated fabrics can allow a loose band to move or rotate, particularly when fabric bunches around the ankle. The problem is often a combination of inadequate fastening tension, changing trouser shape and movement during pedalling.
A band that slides upwards may no longer highlight the same part of the pedalling motion. One that rotates can present less reflective area towards approaching headlights. Neither problem is necessarily obvious to the rider.
The solution begins with matching the fastening method to the clothing.
| Fastening | Best practical application | Main consideration |
|---|---|---|
| Hook-and-loop | Adjustable fit over loose waterproof trousers | Check fastening overlap and grip |
| Snap fastening | Clothing with a consistent ankle circumference | Fixed settings may not fit bulky layers |
| Buckle strap | Thicker gaiters or variable winter clothing | Avoid excessive tightening or loose strap ends |
| Elastic band | Close-fitting tights or cycling leggings | May migrate on smooth, loose rainwear |
| Clip-style reflector | Compatible boots, gaiters or clothing attachment points | Confirm secure attachment and outward-facing orientation |
For loose rain trousers, an adjustable hook-and-loop or buckle strap is often the most practical starting point. Close-fitting cycling tights may hold an elastic band more consistently. On boots or gaiters, the decisive factor is whether the accessory remains attached without interfering with walking or pedalling.
When fitting a band, gather excess trouser fabric neatly and position the reflector where the fastening can hold it consistently. Tighten it enough to prevent movement but not enough to create pressure, discomfort or restricted ankle flexion. Keep fastening ends away from the chain, crank and other moving components.
Before leaving, pedal for approximately a minute in a safe stationary setup or during a short low-risk test ride. Check whether the band has rotated, slipped or caught against the trouser leg. Repeat the check after changing rainwear or adding winter layers.
The purpose of this test is straightforward: maintain a visible reflective surface throughout the pedalling movement, without making the accessory uncomfortable enough that it gets removed halfway through the journey.
Secure placement matters more than aggressive tightening. A comfortable band that stays correctly oriented is generally more useful than a larger reflector that repeatedly slips out of position.
Which Should You Choose: Reflective Ankle Bands or Reflective Tyres for Night Commutes?
Choose reflective ankle bands when you want portable visibility that highlights pedalling motion, especially across different bicycles and commuting outfits. Choose reflective tyres when you want a consistent reflective feature around the wheels, particularly for side-on approaches. Neither option has been established as universally superior, and combining them can provide complementary visibility.
These accessories work differently. Ankle bands identify movement associated with the rider. Reflective tyre sidewalls place retroreflective material around the wheel, creating a circular outline when suitably illuminated from the side.
For a driver approaching from a side street, the reflective circle can help reveal the bicycle’s wheels even when the rider is not pedalling. From the front or rear, ankle bands may offer useful biological-motion information, but their actual visibility still depends on their orientation and illumination.
The choice should reflect both your route and the practical question of who owns the visibility equipment: the rider or the bicycle.
| Criterion | Reflective ankle bands | Reflective tyres |
|---|---|---|
| Primary visual contribution | Highlights pedalling movement | Outlines the wheel |
| Side-on visibility | Depends on exposed surface and leg position | Useful when reflective sidewalls face headlights |
| When coasting | Motion cue diminishes | Wheel outline remains available to reflect light |
| Changing bicycles | Easy to transfer | Remains attached to one bicycle |
| Maintenance | Check fit, fastening and cleanliness | Check sidewall condition and cleanliness |
| Replacement | Independent of tyres | Reflective feature changes when tyres are replaced |
Consider a hypothetical commuter alternating between a folding bicycle on weekdays and a conventional bicycle at weekends. Reflective ankle bands can move between both bicycles without equipment changes. Reflective tyres would need to be fitted separately if the rider wants the same feature on each.
Now consider a commuter frequently crossing roads where vehicles approach from perpendicular directions. Reflective tyre sidewalls offer a useful addition because their circular pattern can be presented broadside to approaching headlights. Bands can contribute too, but may not remain favourably oriented throughout every pedal stroke.
The evidence is not a direct head-to-head test. The cited cyclist-recognition experiments investigated reflective clothing and biological motion, not a controlled comparison between ankle bands and reflective tyres. Any route-based preference is a practical inference from their different positions and reflective geometry.
Budget also matters. Ankle bands are independent accessories, whereas reflective tyre sidewalls are part of the tyres themselves. If existing tyres are in good condition, replacing them solely to gain reflective sidewalls is not automatically the most economical choice.
For a commuter who changes bikes or clothing regularly, bands offer flexibility. For a bicycle used consistently on roads with frequent side approaches, reflective tyres can add persistent side-facing reflectivity. Both remain supplementary to suitable lights and other required reflectors.
The Reflective Gear Mistake That Leaves You Invisible From Side Streets
The common mistake is concentrating reflective equipment exclusively on the front and rear of the rider or bicycle. A driver approaching from a side street may then see little reflected light because the reflective surfaces do not face that direction. Side-visible wheel reflectors and appropriately positioned ankle bands can help address this gap.
Retroreflection depends on where light reaches a surface and whether that surface can return the light towards the observer. A front-facing reflective panel does not automatically become visible to a driver approaching at a right angle.
Even a large reflective vest may provide limited side-on visibility if its reflective elements are concentrated across the chest and back. Likewise, a rear light primarily designed for drivers behind the bicycle may offer less useful information to a vehicle approaching from the side.
This is an issue of viewing geometry, not simply reflector quantity. Adding more material to an unfavourably oriented surface does not necessarily solve the problem.
Reflective ankle bands can partially improve this situation because pedalling changes the reflective surfaces’ orientation. However, they cannot guarantee a useful return at every moment, and the motion advantage diminishes when the rider coasts or stops.
A side-facing wheel reflector or suitable reflective tyre sidewall provides a different form of visibility that does not depend on continued pedalling.
A simple practical diagnostic can reveal gaps in your equipment. With a companion, use a safe, stationary location away from moving traffic. Have the companion observe or photograph the bicycle from the side while suitable vehicle headlights illuminate it. Compare the result with observations from directly ahead and behind.
Do not rely exclusively on a smartphone photograph. Camera exposure, processing and viewing position can exaggerate or suppress reflected brightness. The exercise is a qualitative comparison, not a certified visibility test.
Look for missing reflective coverage around the side of the bicycle, particularly when the rider is stationary. Check whether the equipment that appears prominent from behind becomes much less conspicuous from a perpendicular angle.
For junction-heavy routes, a combination of side-facing reflectors, visible bicycle lighting and lower-leg reflective markings offers more varied visual information than front-and-rear torso reflection alone.
When Should You Add Reflective Motion Gear if Your Route Has Streetlights but Fast Traffic?
Add reflective motion gear when your commute includes faster vehicle approaches, uneven street lighting or repeated crossings where drivers have limited time to recognise you. Streetlights do not guarantee that a cyclist will stand out against the background. Ankle bands offer a low-effort additional cue, although their effectiveness depends on headlights and viewing conditions.
Artificial street lighting can make a road feel adequately illuminated while leaving a cyclist comparatively difficult to distinguish. Bright signs, vehicle lamps, shop windows and unevenly lit surfaces compete for visual attention.
Reflective accessories behave differently from lights: they do not generate illumination. They return light received from external sources, principally vehicle headlights in many night-driving situations. Their effectiveness therefore changes with the direction and intensity of that illumination.
Vehicle speed adds another consideration. At higher closing speeds, the available time between recognising a cyclist and reaching their position becomes shorter. This makes reliable recognition important, although the available studies do not quantify the specific benefit of ankle reflectors at different traffic speeds.
Evaluate your route using four practical criteria:
- Lighting continuity: Are there dark stretches between streetlights or abrupt transitions between bright and dim areas?
- Vehicle approach speeds: Are cars travelling substantially faster than the bicycle?
- Conflict points: How frequently do side roads, junctions, driveways or turning vehicles intersect your path?
- Existing visibility: Do your lights and reflectors remain distinguishable against the surrounding illumination?
A route with multiple fast approaches and inconsistent lighting is a stronger candidate for additional visibility equipment than a slow residential route on a well-separated cycle track. That does not mean reflective bands are harmful or useless on quieter routes; it means their practical priority may be lower.
In wet weather, reduced contrast, reflections and spray can make visual conditions more complex. Keeping reflectors clean and properly exposed is sensible, but no fixed improvement in recognition distance can be promised for those conditions.
The aim is to add visual information without increasing the burden of commuting. A pair of comfortable ankle bands may be practical precisely because the rider can attach them quickly and use them with different outfits.
Prioritise functioning lights and safe route choices first. Where those foundations are already in place, ankle reflectors can provide a useful additional recognition signal during higher-exposure sections of the commute.
How to Aim Your Front Light So You Can See the Road Without Dazzling Oncoming Traffic?
Aim your bicycle’s front light so its strongest illumination falls on the road ahead rather than directly into approaching road users’ eyes. Use a downward-directed beam, preferably with effective glare control, and check the setting from another person’s eye level. The correct adjustment depends on the light’s mounting height, optics and riding conditions.
A front light has two related but distinct functions: making the bicycle visible to others and illuminating the rider’s path. A powerful beam can improve road illumination, but excessive upward light may create glare that makes nearby cyclists, pedestrians and road details harder for others to discern.
Glare can also work against the rider using the lamp. If an approaching road user struggles to distinguish the cyclist’s position or the surrounding road scene, additional brightness is not necessarily an improvement in practical visibility.
Walk Wheel Cycle Trust provides practical advice on cycling in the dark, including aiming the front beam down towards the road. It suggests an angle of around 3.5 degrees, but this is guidance rather than a universal optical setting.
A practical home adjustment method is to position the bicycle upright in front of a wall on level ground. Mark the lamp’s mounting height, observe where the strongest part of the beam falls and adjust it downward so the main illumination does not project above the intended road-facing region.
For a lamp with a defined upper cut-off, use that boundary to guide adjustment. A lamp with an unrestricted circular beam requires particular care because its upper portion may still shine into approaching eyes even when the central hotspot points downwards.
Have a companion evaluate the light from a safe position ahead of the bicycle. The companion should be able to identify the bicycle without being subjected to uncomfortable direct glare. Repeat the check after moving the light, changing mounting hardware or carrying a load that alters the bicycle’s attitude.
On illuminated city streets, a moderate, well-directed beam can provide practical forward visibility. On unlit roads, greater illumination may be necessary, but increased output should still be paired with appropriate optics and careful aiming.
There is no universal wall-marking distance or hotspot position that guarantees a glare-free result for every lamp. Beam shape matters as much as nominal brightness.
Once the beam is correctly directed, reflective ankle bands can supply an additional movement cue without emitting their own light or adding active glare.
Which Should You Choose: A High-Lumen Beam or a Daytime Running Light for City Riding?
Choose a high-output, properly controlled headlight when you need to illuminate a dark road. Choose a daytime running light when the main objective is helping other road users notice your bicycle in daylight. Urban commuters riding at different times may benefit from both functions, but brightness alone is not a reliable measure of safety.
Lumens describe luminous flux, not how effectively a bicycle light illuminates a useful area of road or controls glare. Beam shape, mounting position and optical design can matter more than an impressive numerical output.
A daytime running light serves a different purpose. It is intended to make the bicycle’s presence more noticeable against the surrounding daytime environment. Its optical design may emphasise visibility to other road users rather than providing enough illumination to navigate an unlit road.
In urban traffic, the most important visual challenge is often recognising another road user’s position and intended movement near junctions, turning vehicles and other conflict points. A conspicuous front signal can contribute to awareness, but it cannot ensure that a driver has seen the cyclist.
A very bright, narrowly concentrated beam can create a noticeable point of light while making the cyclist’s overall shape harder to interpret. The aim should be clear, appropriately directed visibility rather than maximum output at any cost.
Some daytime lights offer a flashing or pulsing mode, while others provide a steady signal. Whether these modes are suitable or legally permitted depends on the country and the light’s intended use.
Higher-output settings can also consume battery capacity more quickly, reducing operating time between charges. For routine commuting, reliable lighting throughout the journey is more valuable than a short period of unnecessary maximum brightness.
A practical decision is therefore based on riding conditions: use a suitable road-illuminating beam for darkness and a daytime visibility mode designed for daylight where permitted. If a single lamp provides both functions, verify that each mode is suitable for its intended environment.
Regulations differ across English-speaking countries. In particular, do not assume that a flashing mode permitted in one jurisdiction is legal or sufficient everywhere else.
Neither lighting option replaces reflective material. Active lights help make the bicycle visible, while passive reflectors can reveal additional features of the rider and bicycle when suitably illuminated.
Key takeaways before setting up your bicycle
- Build visibility around different viewing directions: forward, rearward and sideways, rather than concentrating everything on one surface.
- Choose a front beam with useful road illumination and controlled glare, then check its actual alignment.
- Use ankle reflectors to highlight pedalling motion, while retaining static reflective features for moments when the bicycle is coasting or stopped.
Which Bike Lighting Setup Lets Drivers See You From 150 m Without Blinding Them?
No bicycle lighting arrangement can guarantee that every driver will recognise a cyclist from 150 metres. A practical night-riding setup combines a well-aimed white front light, a visible red rear light, appropriate passive reflectors and reflective ankle bands. This layered approach provides several visual cues without depending on an excessively bright headlight.
Recognition distance changes with road geometry, ambient lighting, weather, headlight intensity, driver characteristics, reflector orientation and the cleanliness of reflective surfaces. Research on night-time cycling visibility supports the value of lower-leg markings, but it does not validate a universal 150-metre recognition threshold.
The distinction between detection, recognition and distance judgement is important. A driver may initially notice a light without knowing what produces it. Recognising a cyclist requires more information, while judging that cyclist’s distance and movement requires additional visual context.
A complete arrangement should therefore make the bicycle visible while also providing recognisable visual structure.
- White front light: properly aimed to illuminate the route while controlling light directed towards approaching eyes.
- Red rear light: correctly oriented and unobstructed by clothing, bags, racks or other equipment.
- Static reflectors: rear, pedal and side-visible elements as applicable, including suitable reflective wheel features.
- Reflective vest or clothing: visible torso markings that complement the moving reflectors.
- Reflective ankle bands: securely mounted lower-leg markings that highlight the movement of pedalling.
The legal baseline must be checked separately from optional visibility upgrades. For example, the UK Highway Code rules for cyclists identify reflective ankle bands as optional visibility aids. Rule 60 requires white front and red rear lights at night, as well as applicable rear and pedal reflectors. These UK requirements should not be treated as universal rules for other English-speaking countries.
Reflective accessories are additions to that foundation, not substitutes for legally required lighting.
Five-point night cycling visibility check
- Verify both lights: switch on the front and rear lamps, inspect their output and record whether both function reliably.
- Check the front beam: observe its position against a wall and from a safe oncoming viewpoint; confirm that it illuminates the road without uncomfortable direct glare.
- Secure the ankle bands: fasten them over your actual commuting clothing, pedal briefly and confirm that neither band slips, twists or interferes with movement.
- Inspect side visibility: use a safe stationary side-on observation with suitable illumination and identify any poorly visible wheel or rider surfaces.
- Review the whole setup: confirm that lights are unobstructed, reflectors are clean and the equipment remains comfortable; keep a short checklist of anything requiring adjustment.
If you want to assess recognition at a particular distance, arrange a controlled observation in a safe location away from moving traffic. Position a companion at a measured distance with suitable illumination and ask whether the bicycle can be identified as a cyclist rather than merely noticed as a light.
This can be repeated at different distances, provided the route is safe and the participants do not stand in traffic or use vehicle headlights in a way that endangers others. A photograph alone cannot reproduce human visual perception reliably.
Such an exercise provides a practical impression of your equipment under those specific conditions. It is not a validated measurement of driver reaction time, collision avoidance or universal visibility performance.
The lower-leg research provides a reason to include moving reflectors: it demonstrates that highlighting pedalling movement can improve recognition compared with vest-only clothing in tested conditions. The lights, meanwhile, provide active illumination or position signals even when nearby headlights are absent.
Before your next evening commute, check your light alignment, fasten comfortable ankle bands and assess visibility from the front, rear and sides. The objective is not to achieve an unverified 150-metre promise, but to make your bicycle easier to notice and recognise across the conditions you actually encounter.
Are reflective ankle bands more effective when worn on both legs?
Using both ankles can present reflective movement on either side of the bicycle and may make the pedalling pattern easier to interpret from different viewpoints. However, the cited experiments do not establish an exact additional recognition benefit from using two bands instead of one. A secure, unobstructed fit remains essential.
Do reflective ankle bands work when a bicycle is stopped?
Yes, they can still return light from vehicle headlights when the material is suitably illuminated and oriented. What disappears is the biological-motion cue created by pedalling. Static reflective surfaces and working bicycle lights are therefore especially useful when waiting at junctions or coasting.
Are reflective ankle bands useful during daytime commuting?
Reflective bands are primarily valuable in darkness and suitable low-light conditions because retroreflective performance depends on illumination and viewing geometry. In daylight, high-visibility clothing and appropriate daytime lighting may provide more useful visual contrast. The night-time recognition studies cannot establish a comparable benefit for ankle bands in daylight.
Can reflective ankle bands replace bicycle lights legally?
No. Reflective ankle bands are passive accessories, not an equivalent replacement for required front and rear lights. In the United Kingdom, the Highway Code requires appropriate bicycle lighting at night and specifies other reflector requirements. The precise legal obligations should be checked in the country or jurisdiction where you ride.
How often should reflective ankle bands be replaced?
There is no universal replacement interval established by the cited research. Inspect the reflective surface, fastening and overall condition regularly. Replace bands when reflective material becomes badly damaged, the fastening no longer holds securely or the accessory can no longer remain correctly positioned during pedalling. Follow the manufacturer’s care and replacement guidance where available.